前言
在 PVE 平台中 识别不到 STAT 固态硬盘 只能识别 M.2 固态硬盘 这个坑就折腾了好久把 9-7 都安装了一遍后才发现问题
在 PVE 中安装 OpenWrt 并使用 5G 模块仍是经常出现断连 怀疑是 USB 底板接触不良 遂买新
安装 OpenClash 后可能规则比较多,容量急剧不足导致 dnamasq-full 损坏,根据该博客尝试扩容硬盘到 1G,结果直接没法启动,一直进入 grub 系统,查资料可能是引导损坏,不会修复
感觉问题好多 遂安装 esxi 尝试下
安装虚拟机
下载了官网免费许可证的 8 版本镜像,提示找不到网卡 no network adapter ,查资料说需要手动打网卡驱动补丁,打完还是不行
在林总的提醒下,到咸鱼上购买 7 版本镜像,还是一样的错误,6.7 官方版本也不行,这时候卖家拿出收藏的袖珍镜像,据说是自己修补的,安装,遂成功
进入系统后,在页面上看到 dhcp 获取的管理网页,由于我准备在里面安装 OpenWrt,所以手动设置了静态 ip 为 2,以免后续找不到管理 ip 由于虚拟机本身并不需要联网,网关随意,设置为之后将要作为网关的 ip 地址呗,目前网关不存在的情况下也不影响使用。
安装 Openwrt
新建虚拟机
按照该文章新建虚拟机
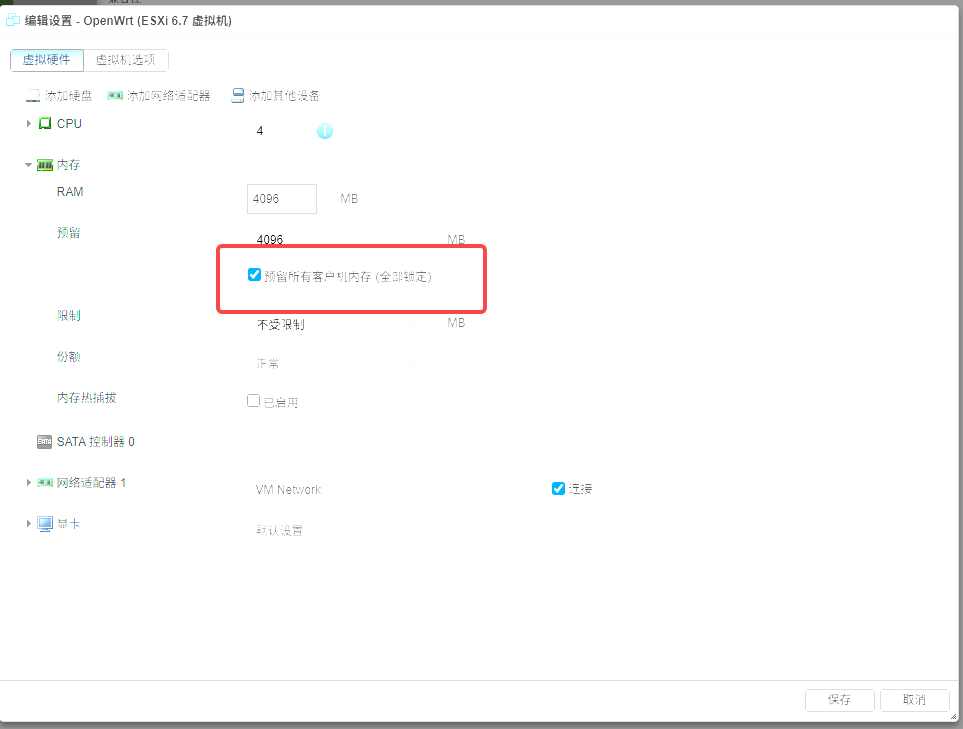 分配 4H4G 记得锁定内存,因为将要用 USB 硬件直通(到这我才想到 PVE 是不是也要锁定内存才行呢?不然可能会有内存地址分配问题),
删掉无用的硬件光盘,网络需要保留,因为只有一个网口,不能设置直通,否则主机本身就无法使用这个网口了。
关闭 UEFI 安全引导 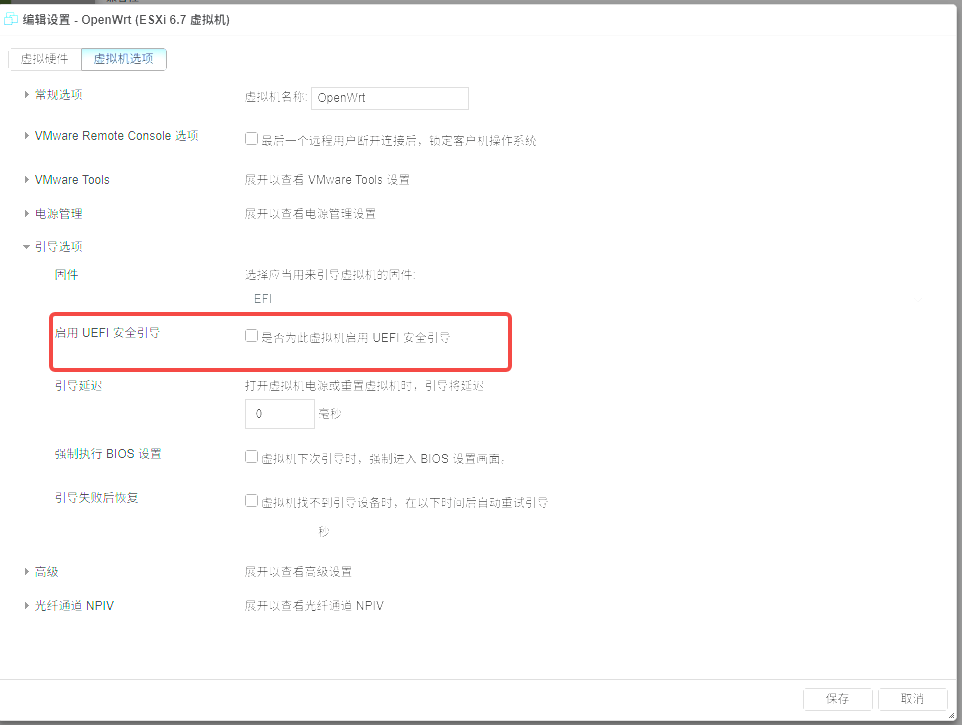
导入镜像
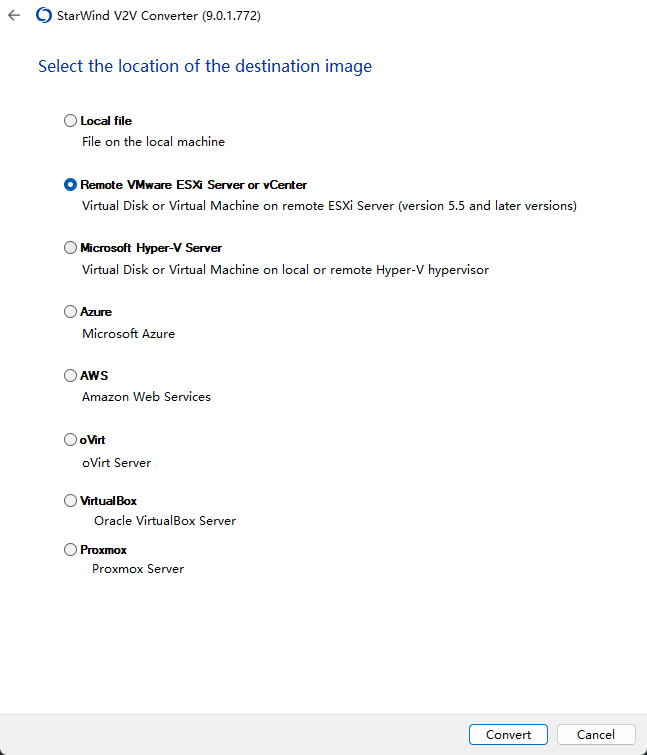
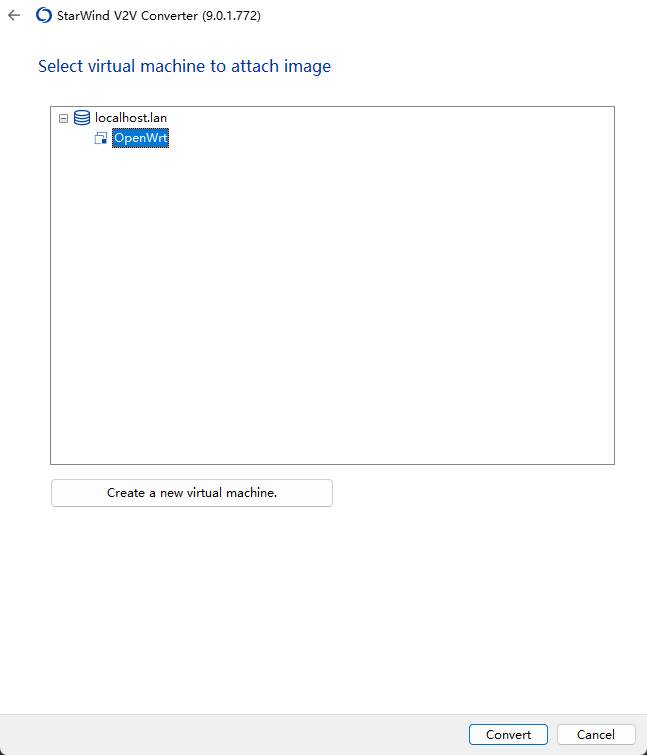
参考了几篇文章都提到使用StarWind V2V Converter软件进行硬盘格式转换,可以直接导入到 esxi 中
 似乎也可以用于 PVE
选择本地文件进行加载
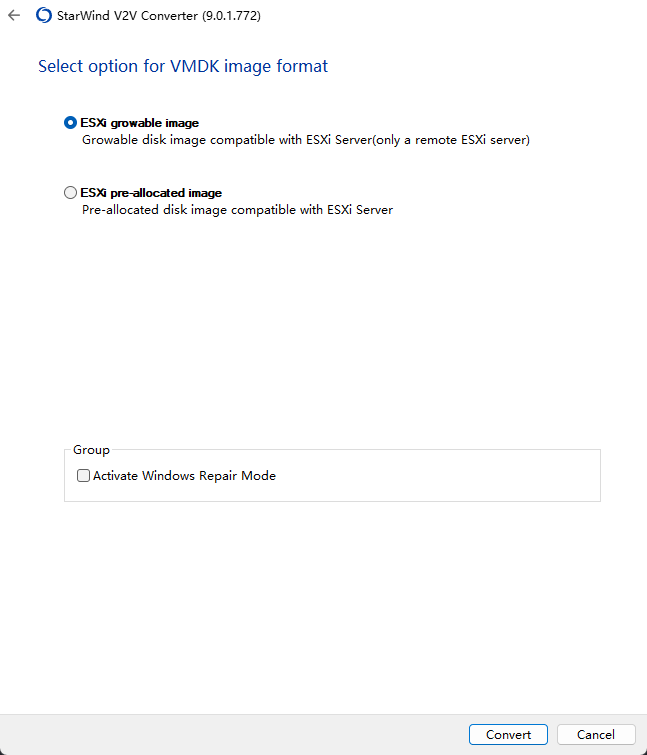
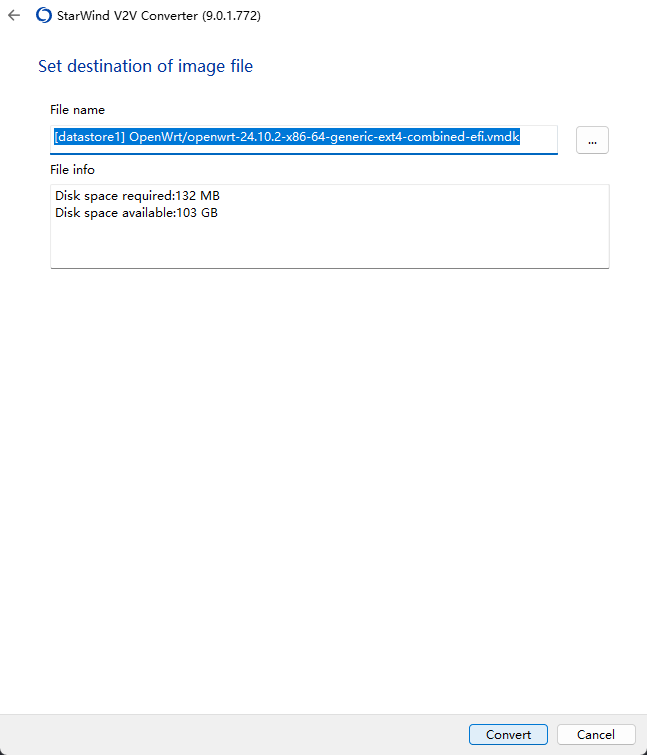
 选好镜像选择目标
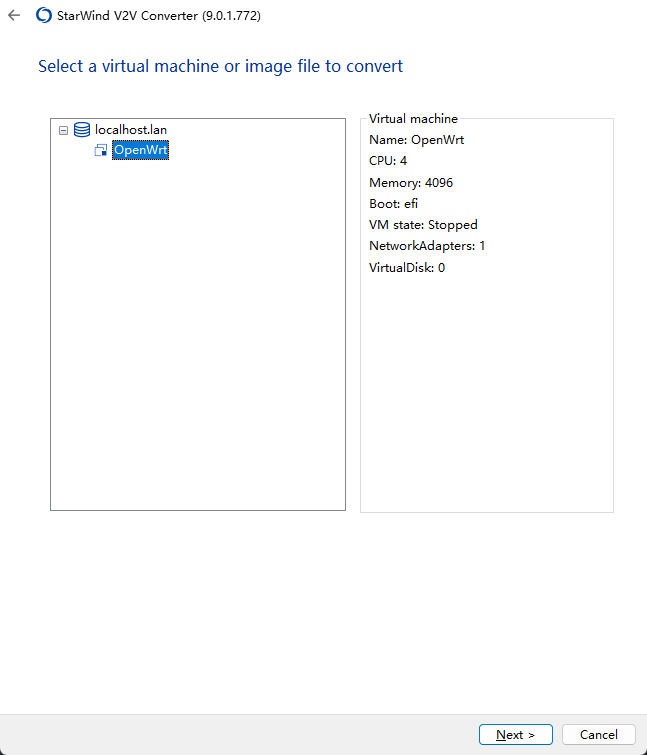
 输入账号密码选择虚拟机
 转换写入
转换写入
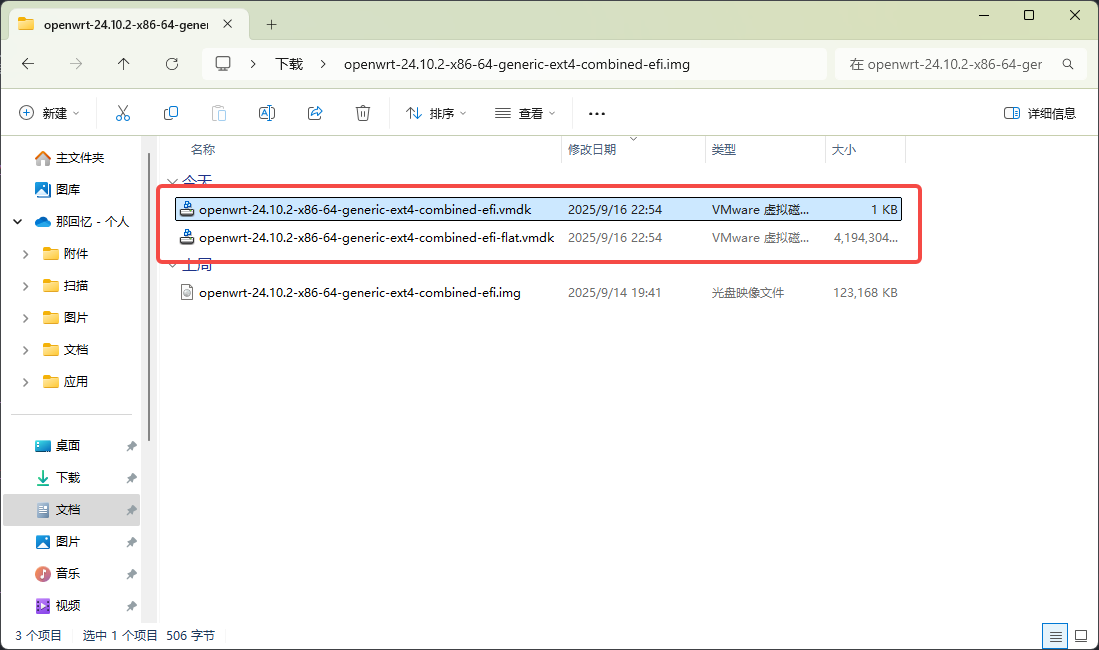
 回到控制台看到硬盘已经导入好了
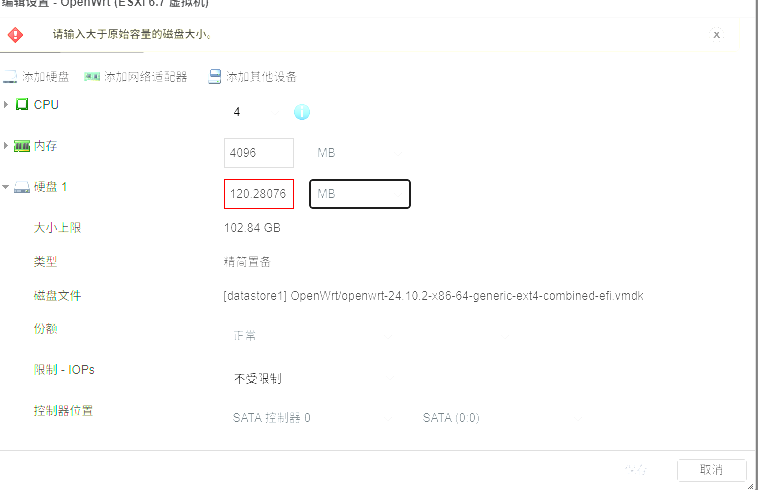
修改成 4G 吧 很好,遇到第一个问题了
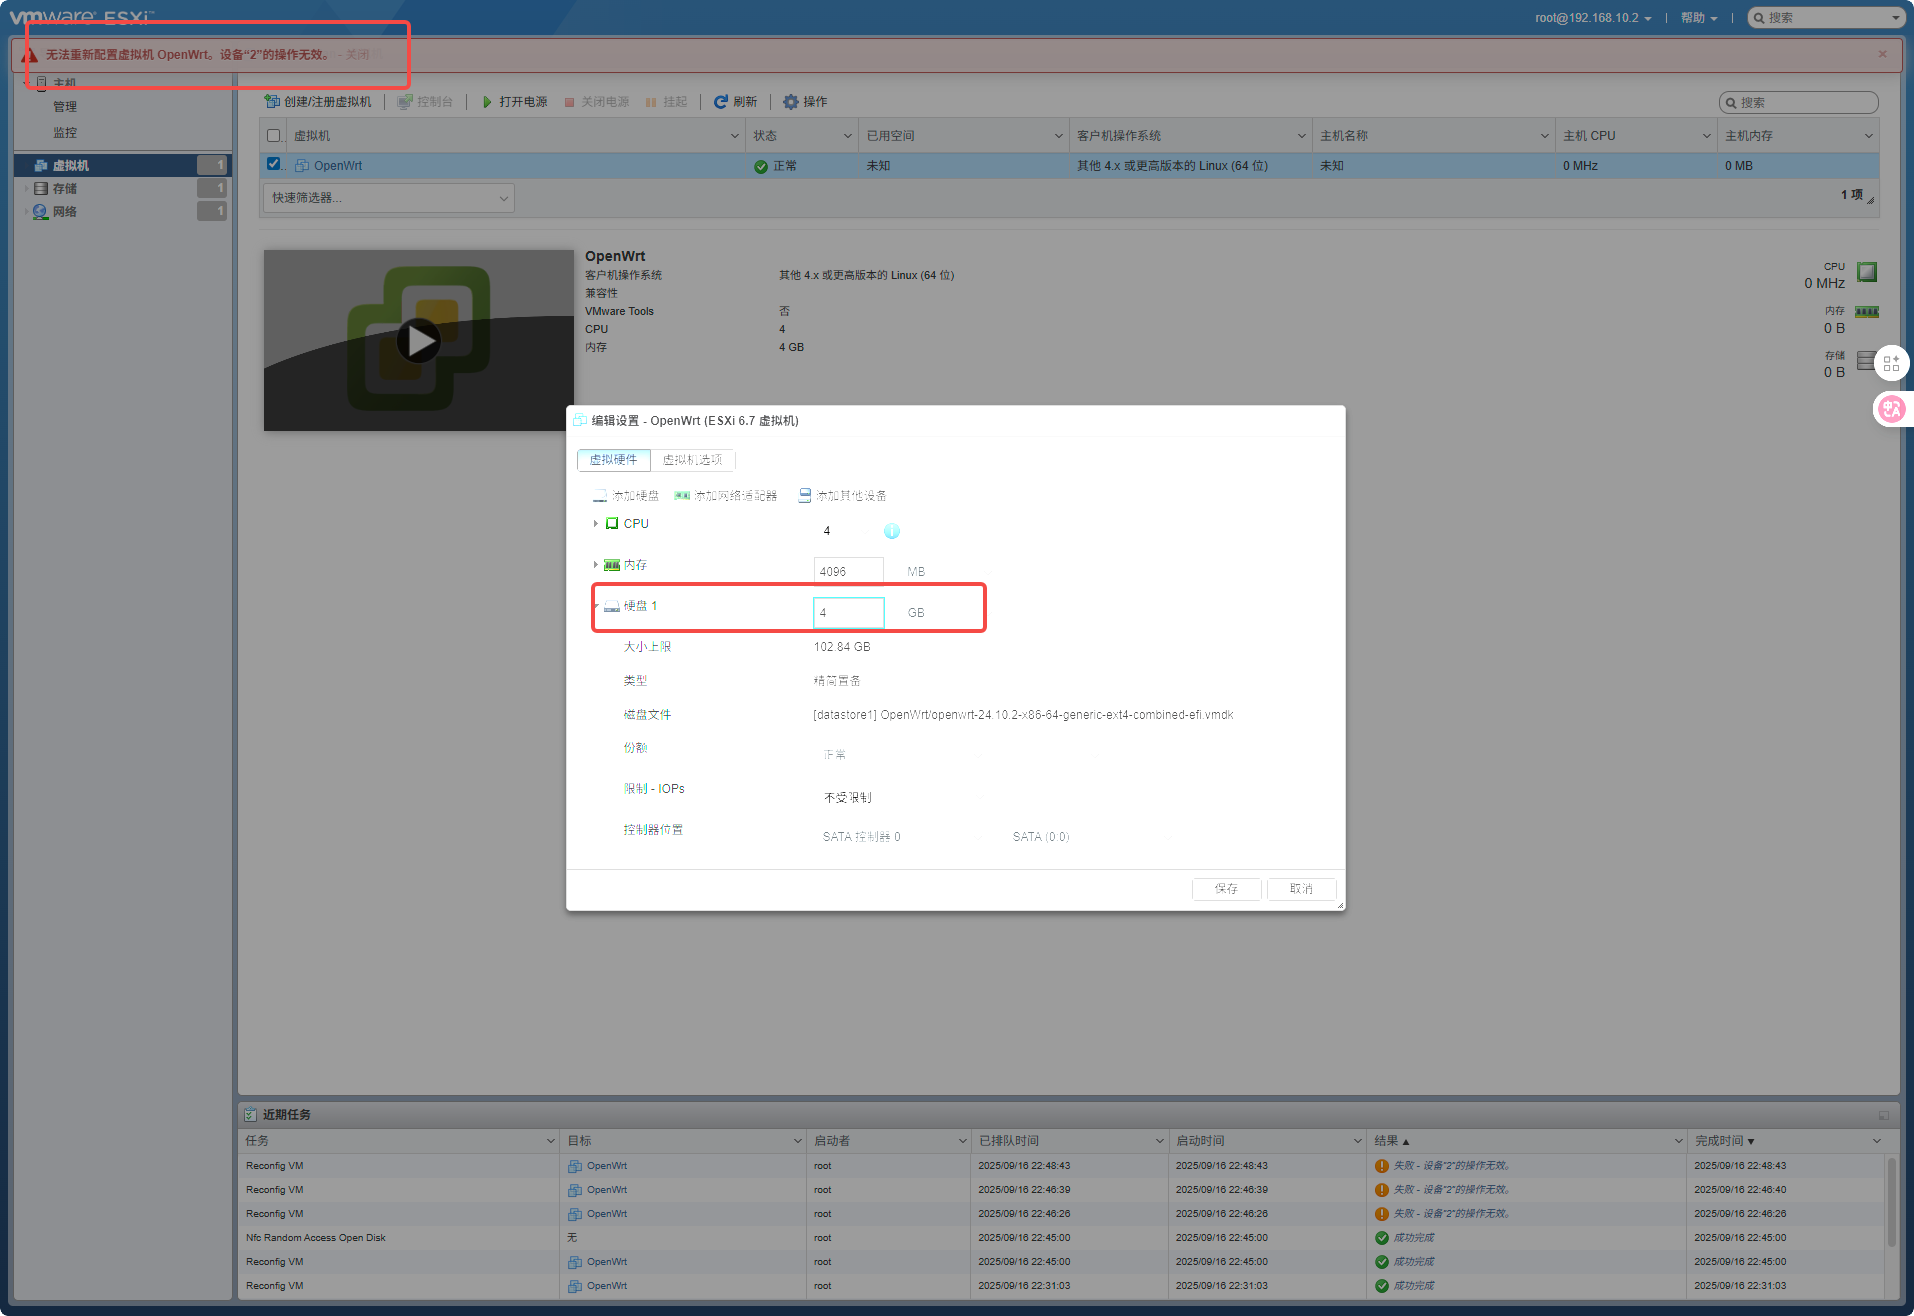 提示:无法重新配置虚拟机 OpenWrt。设备“2”的操作无效。 - 关闭
参考11 楼导出为本地文件
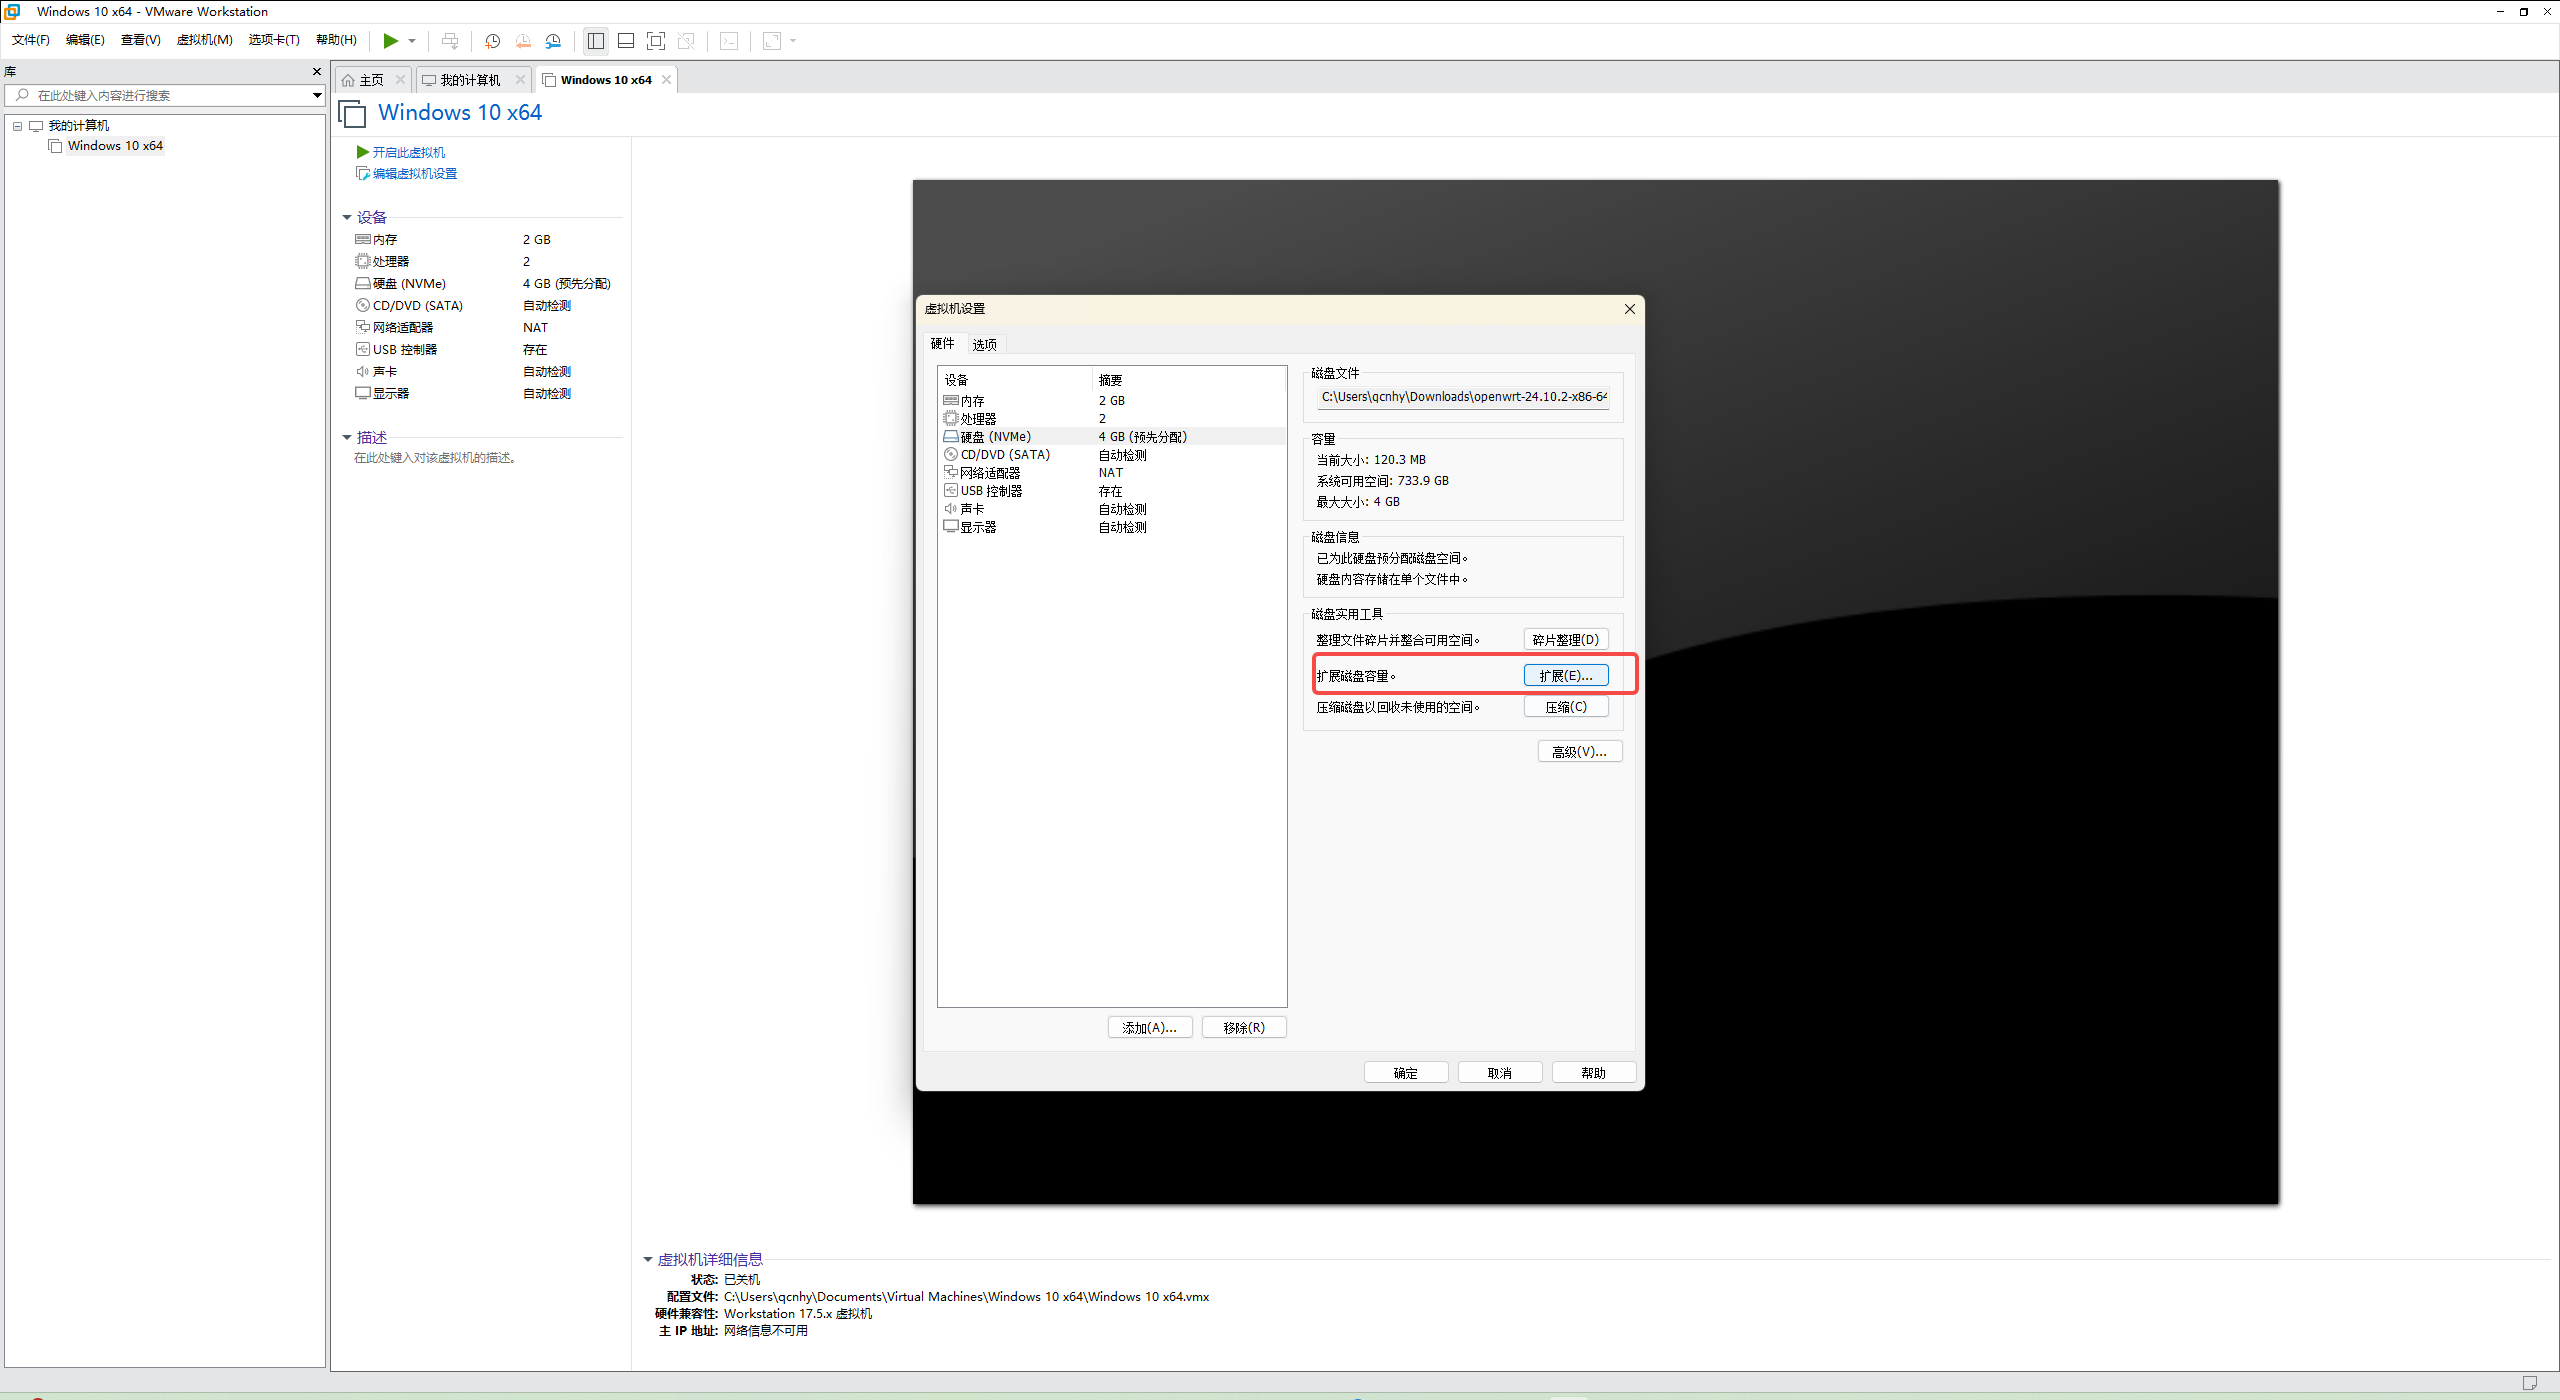
在 VMware Workstation Pro 进行扩展
 再导入进 esxi 里
删除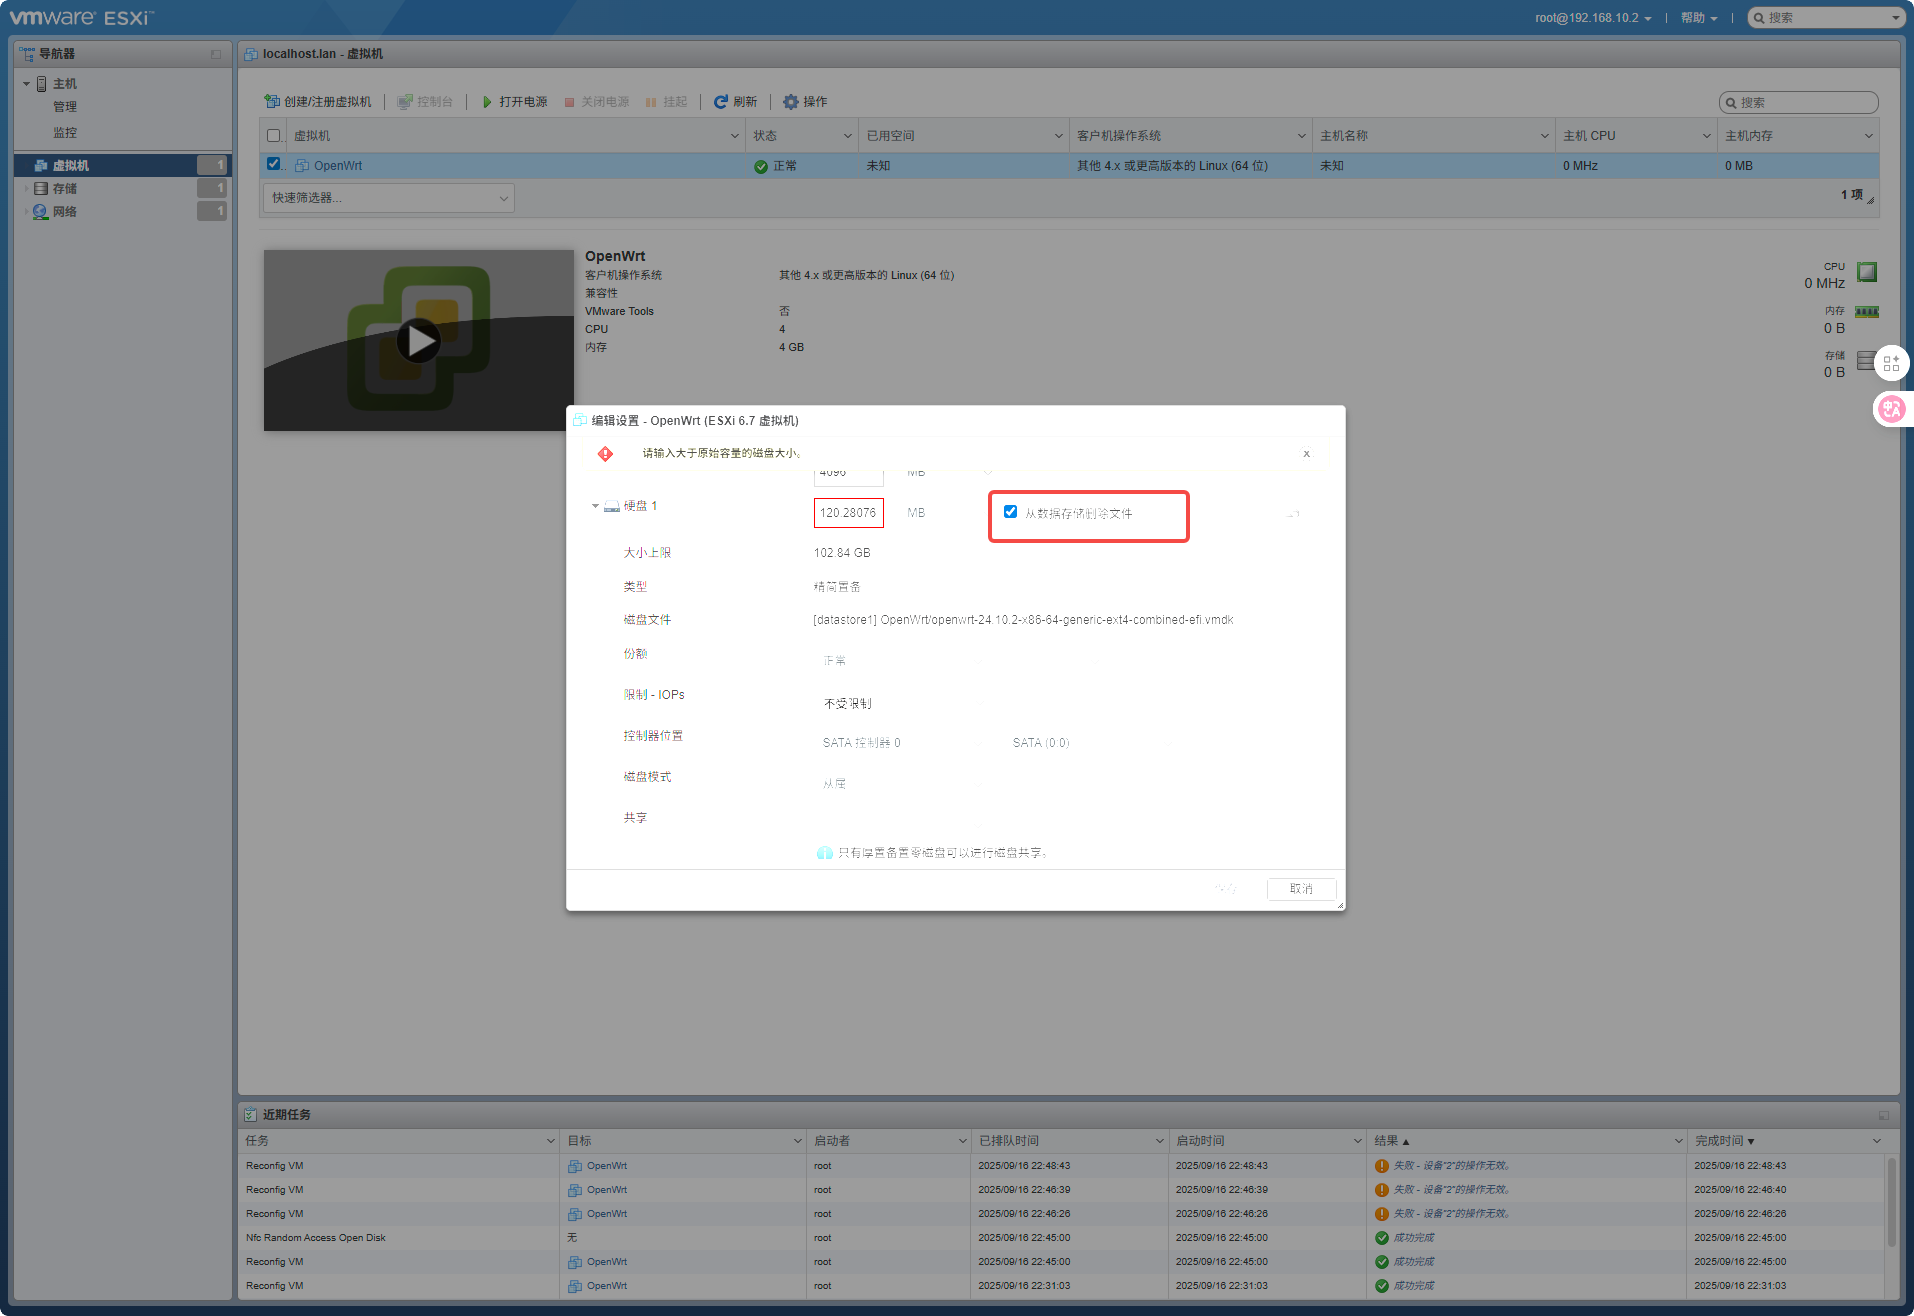 重新选择现有硬盘,上载到数据区
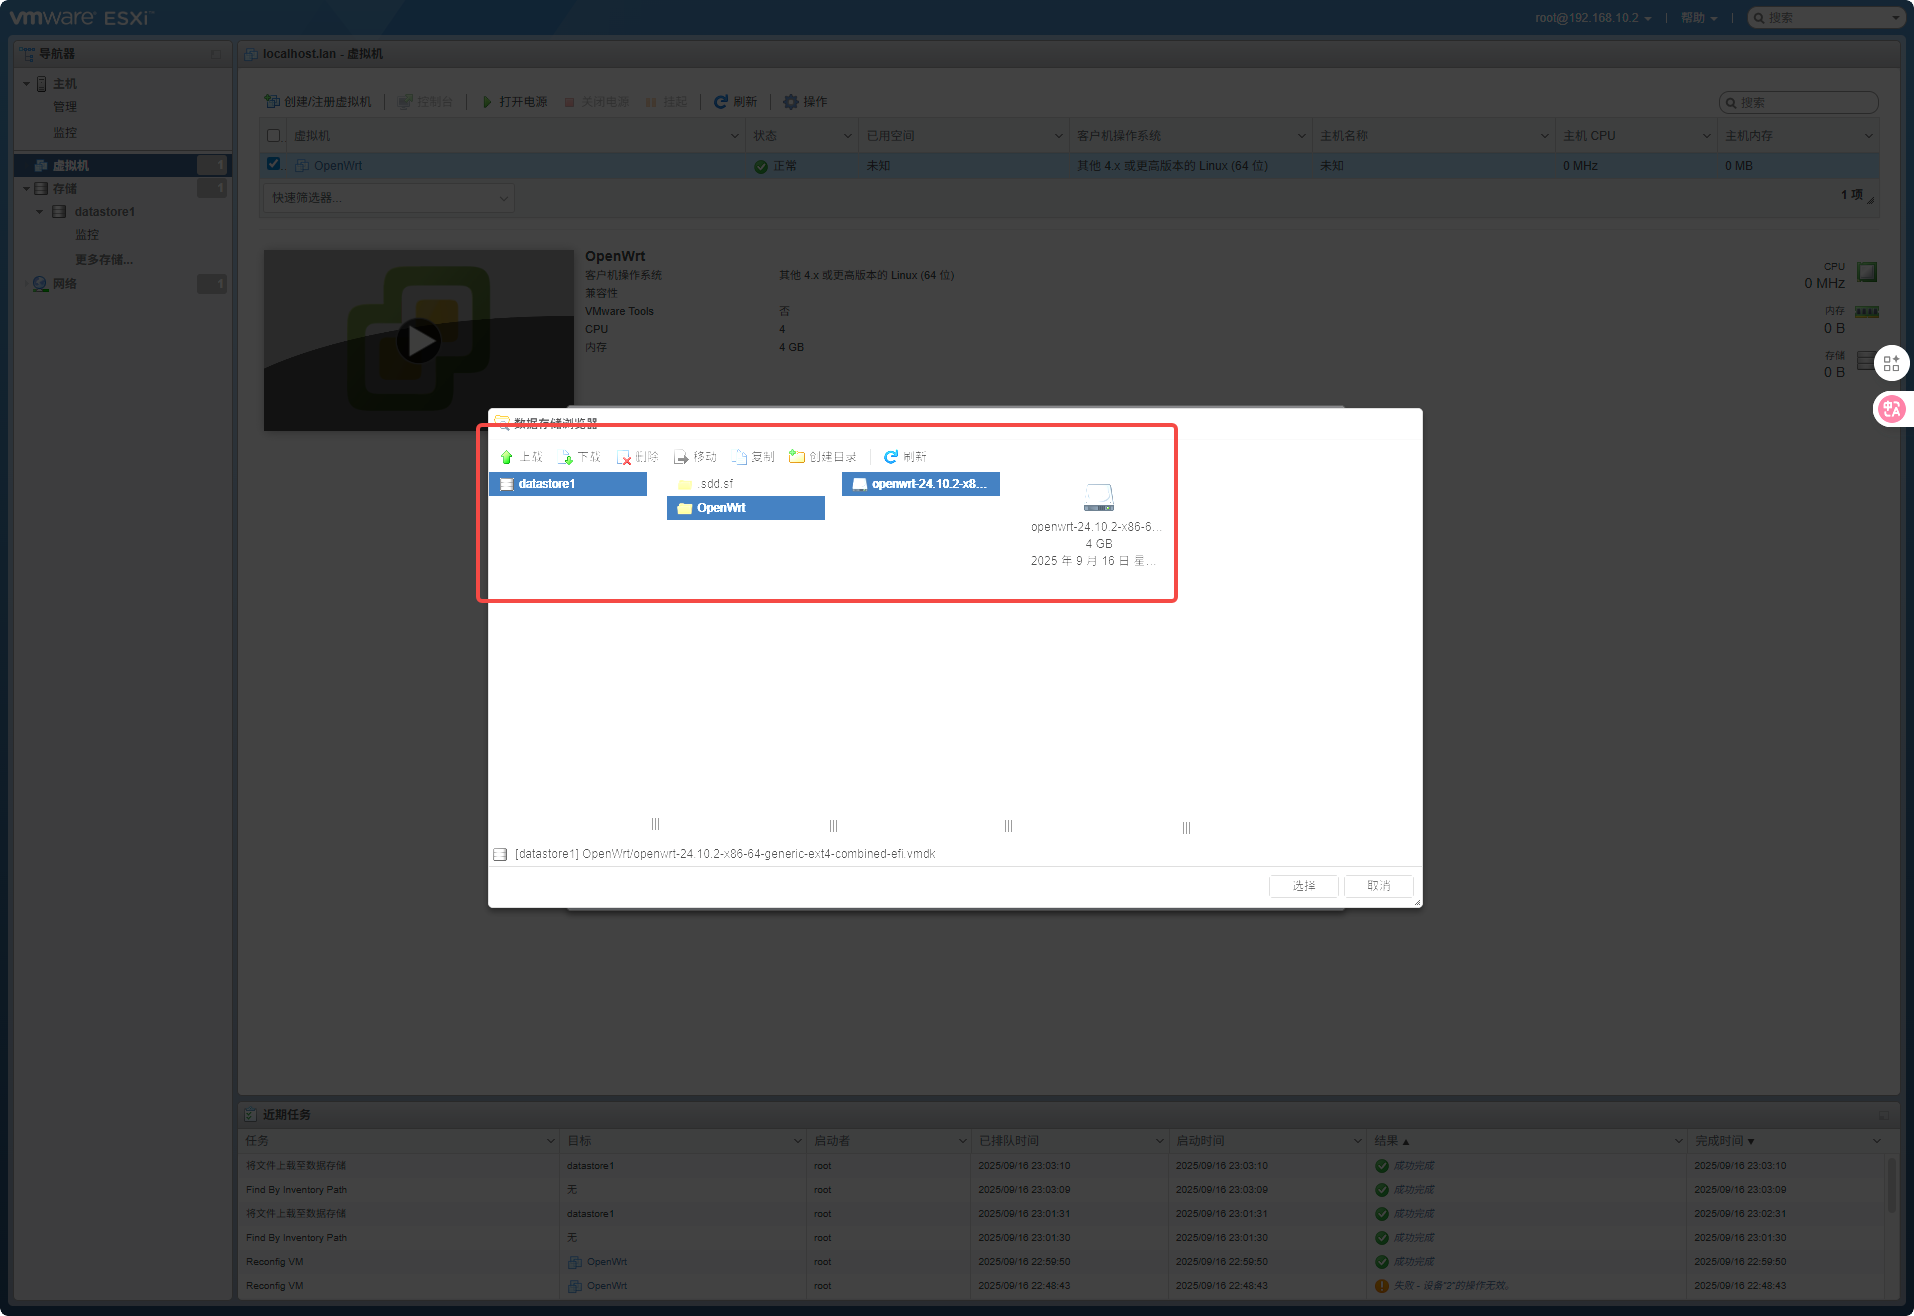
修改网口
由于我使用的是 10 网段,而且稍后 OpenWrt 要连接主路由上网下载驱动程序,也可以网线直连然后修改成同一个网段去访问.1.1
vi etc/config/network
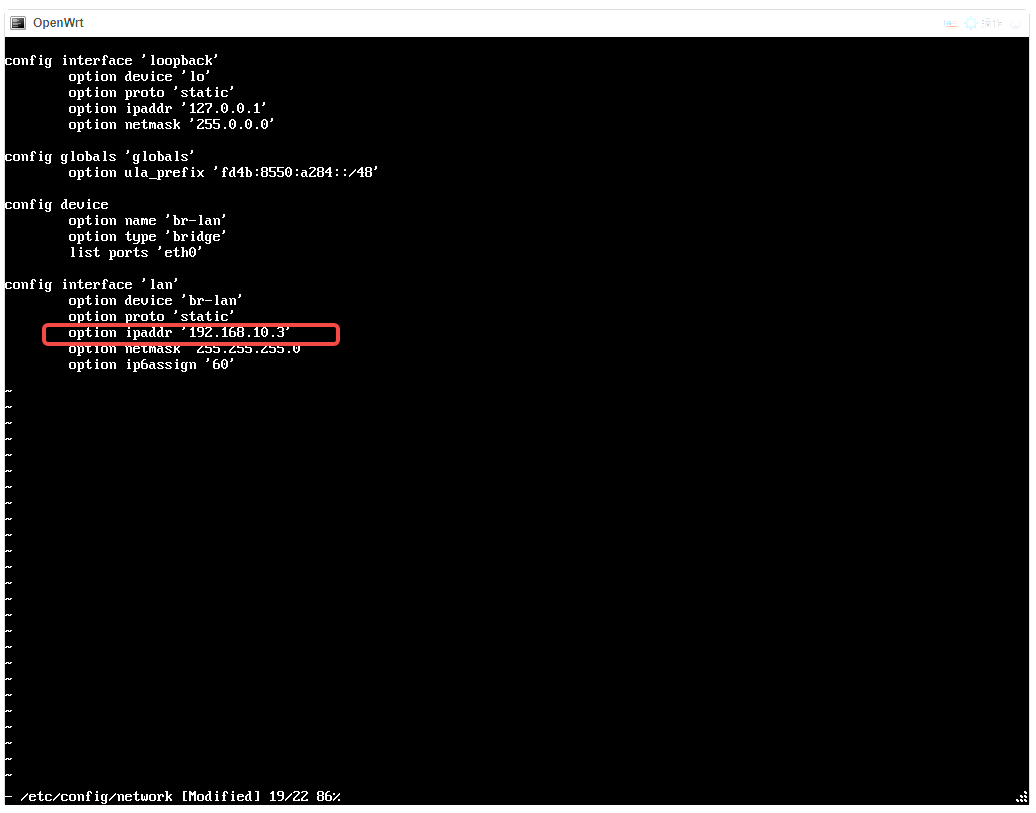 改成 10.3 重启
启动
 很好,进入了
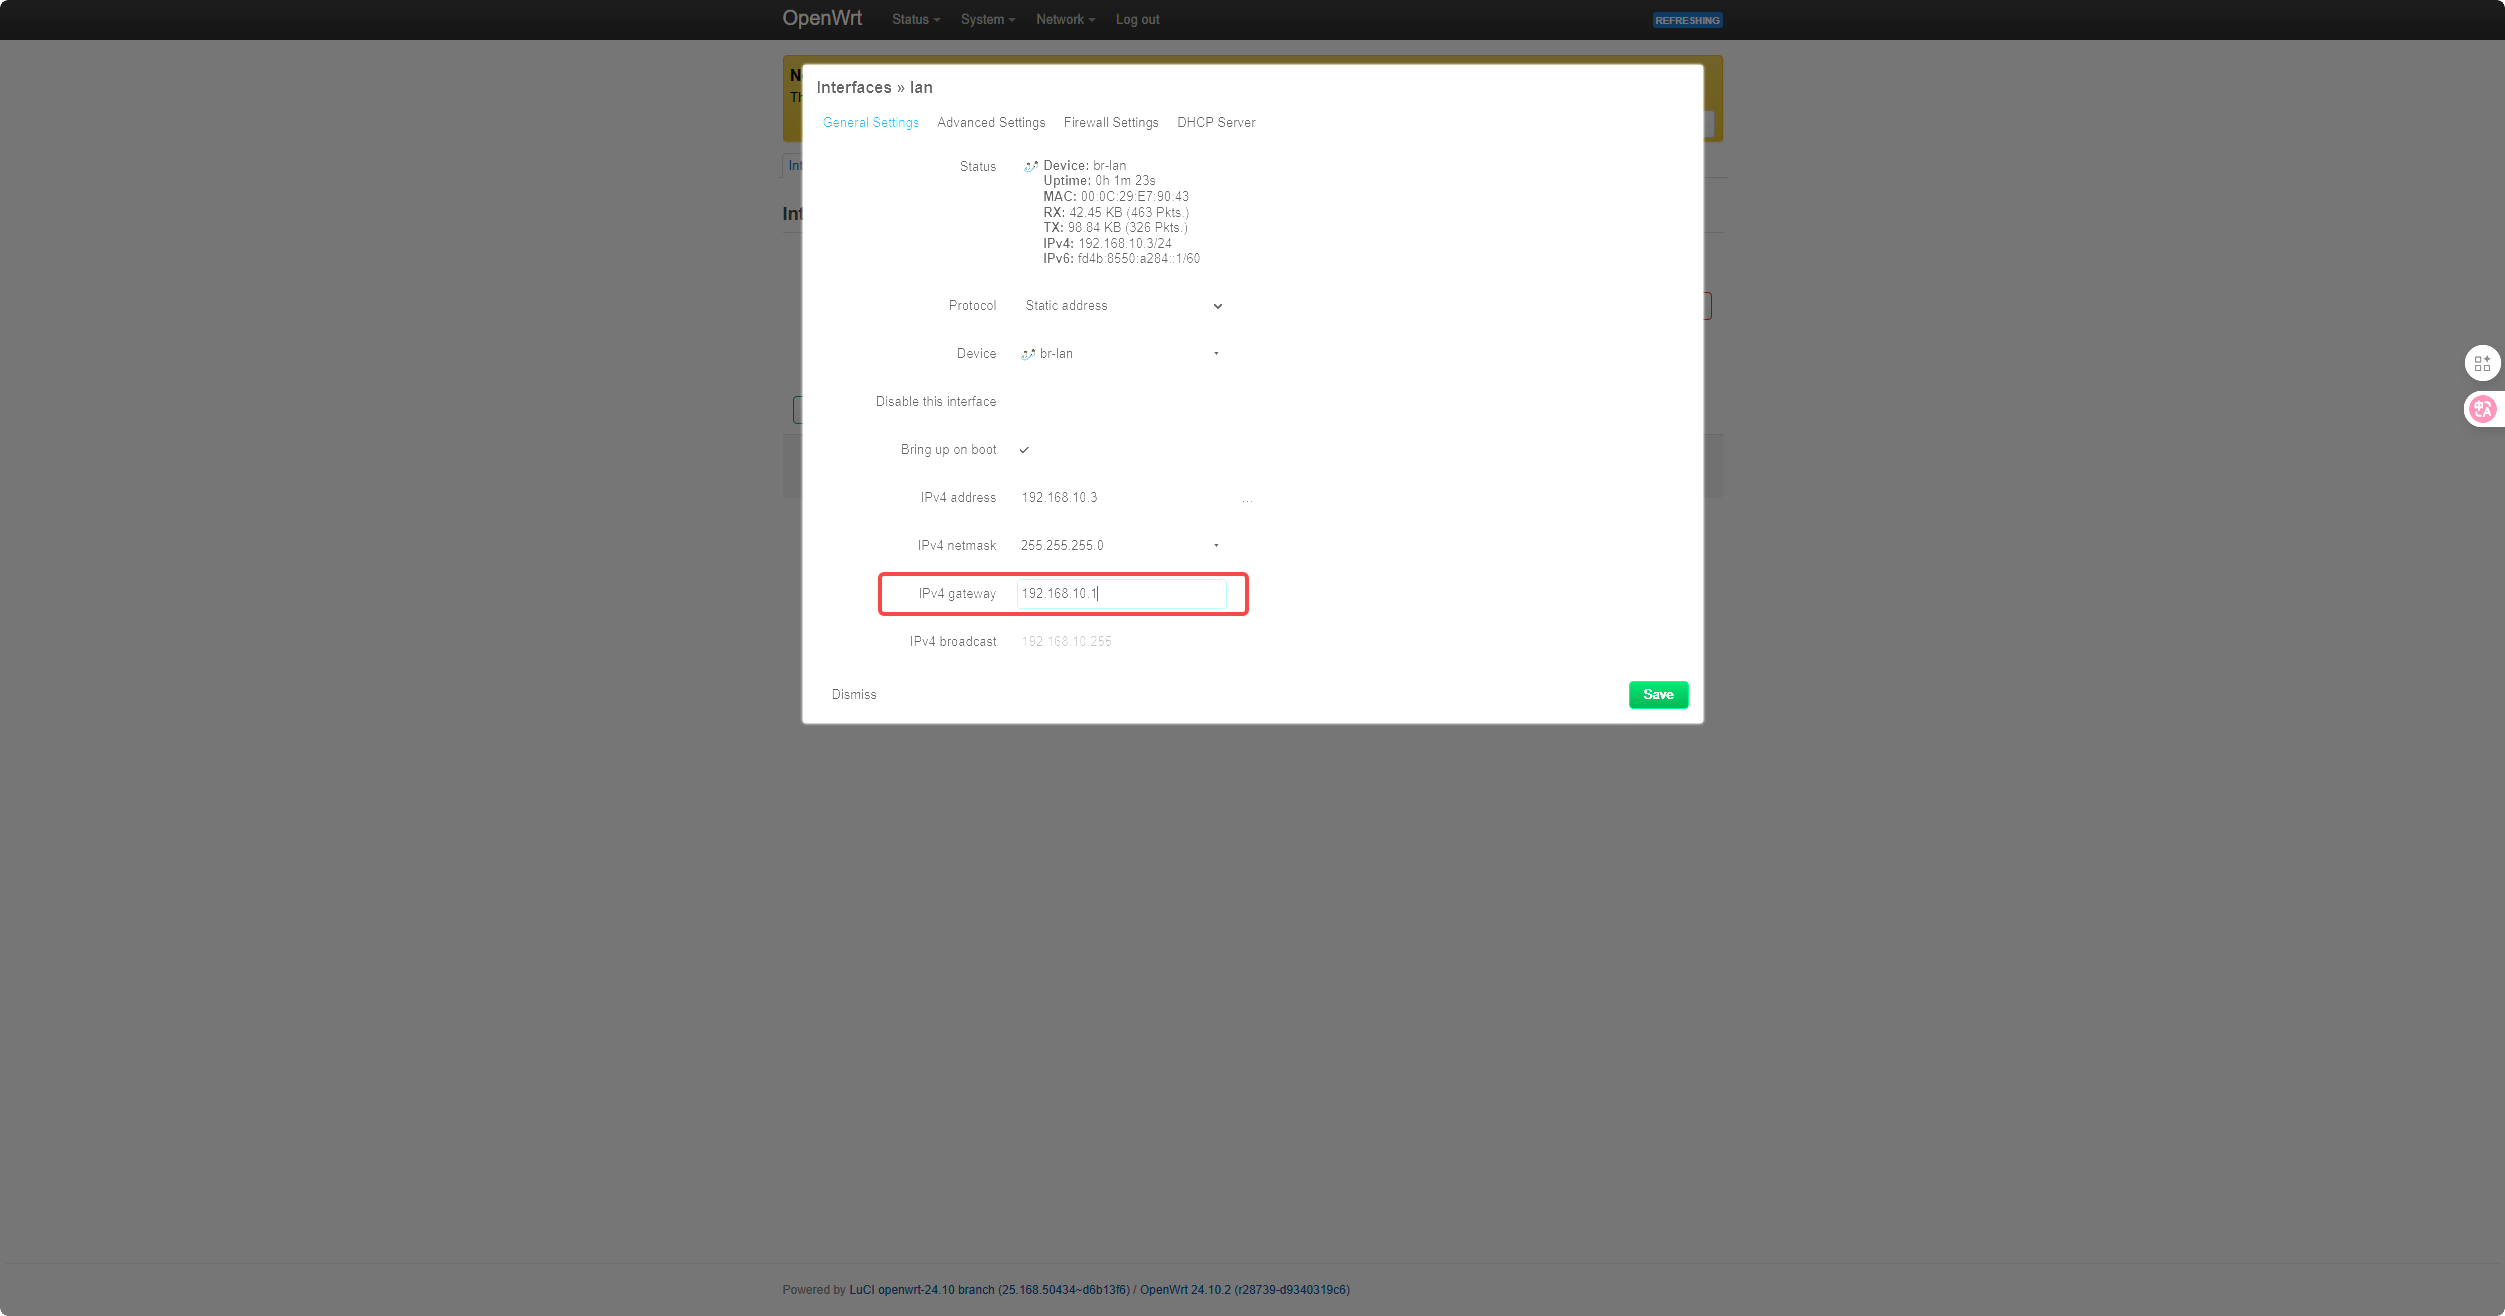
 扩容还是有问题,需要在里面分区,可我现在没网先设置网关
 临时让他通过主路由进行联网,主路由连接我手机的 wifi 做无线桥接
设置代理
 本地 dns 都无法解析域名,可能是由于没有 wan 口,遂设置代理以便下载软件包
在此之前先打个快照,以防不测(快照点 1),最好彻底关机打快照,保持最正确的文件状态
本地 dns 都无法解析域名,可能是由于没有 wan 口,遂设置代理以便下载软件包
在此之前先打个快照,以防不测(快照点 1),最好彻底关机打快照,保持最正确的文件状态
export http_proxy="http://<代理 IP>:<端口>"
export https_proxy="http://<代理 IP>:<端口>"
export http_proxy="http://192.168.10.234:7897"
export https_proxy="http://192.168.10.234:7897"
扩容硬盘
经过上次的教训,先进行扩容分区的操作,避免磁盘空间满造成系统损坏。 还是根据这篇文档
opkg update
opkg install cfdisk
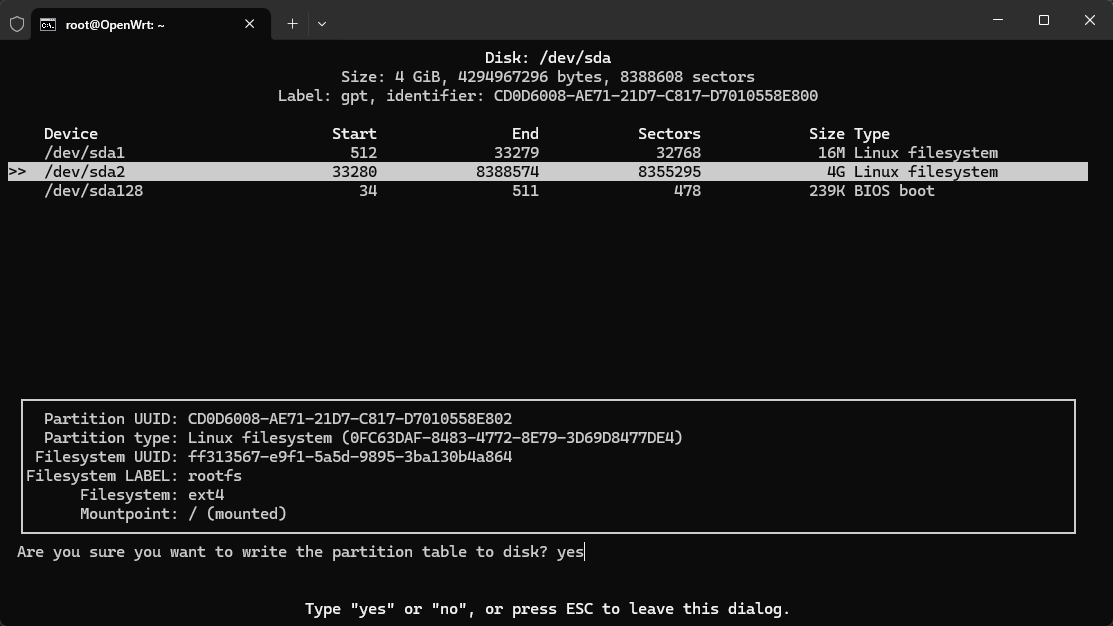
cfdisk
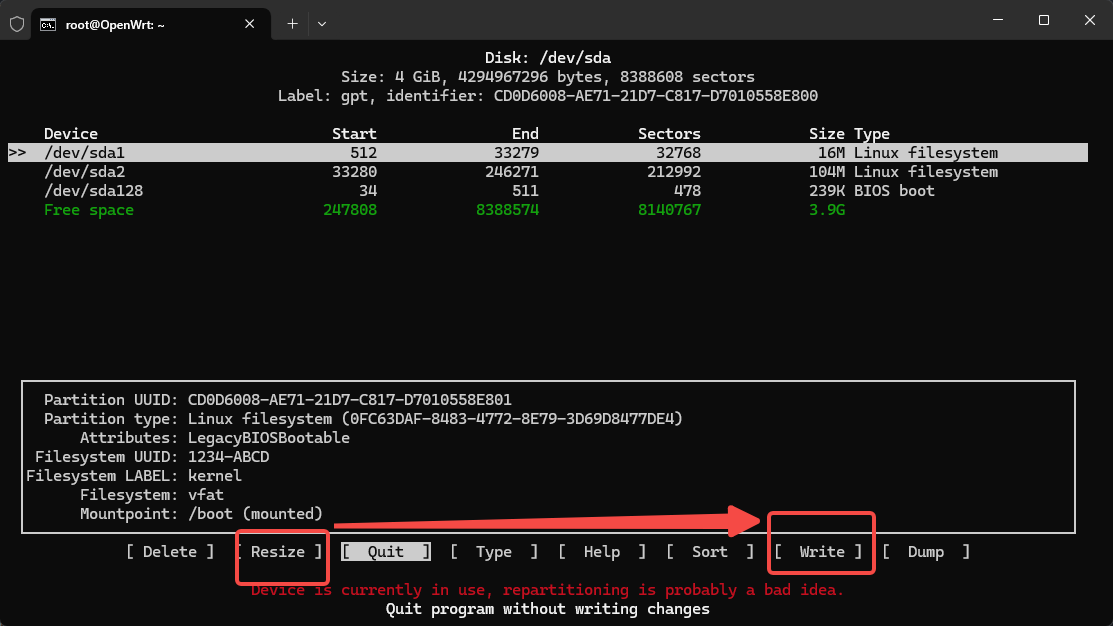 选择需要扩容的 sda2,resize 然后 write
但是用 df -h 查看,根目录分区的大小并没有变化,还需要 resize2fs 操作一下
选择需要扩容的 sda2,resize 然后 write
但是用 df -h 查看,根目录分区的大小并没有变化,还需要 resize2fs 操作一下
root@OpenWrt:~# resize2fs /dev/sda2
resize2fs 1.47.0 (5-Feb-2023)
Filesystem at /dev/sda2 is mounted on /; on-line resizing required
old_desc_blocks = 1, new_desc_blocks = 1
resize2fs: Invalid argument While checking for on-line resizing support
不出乎意料的报错了,继续
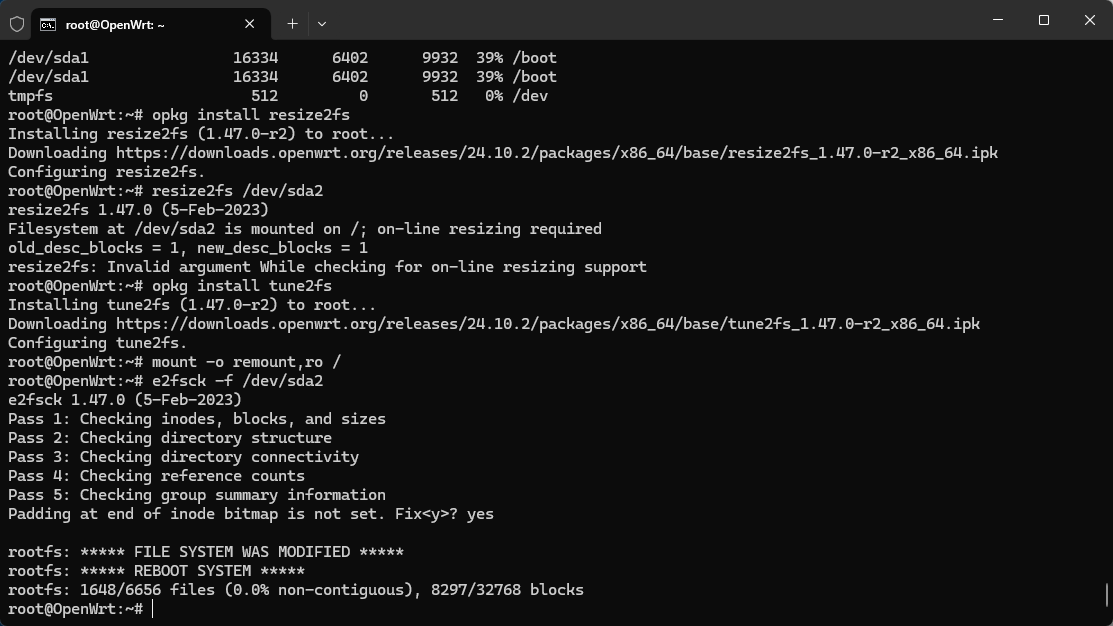
opkg install tune2fs
mount -o remount,ro /
e2fsck -f /dev/sda2
这里只出现了一个 y
 重启之后进行
root@OpenWrt:~# resize2fs /dev/sda2
resize2fs 1.47.0 (5-Feb-2023)
Filesystem at /dev/sda2 is mounted on /; on-line resizing required
old_desc_blocks = 1, new_desc_blocks = 1
Performing an on-line resize of /dev/sda2 to 1044411 (4k) blocks.
resize2fs: Invalid argument While trying to add group #1
又出现了和上一次一样的错误
root@OpenWrt:~# df -h
Filesystem                Size      Used Available Use% Mounted on
/dev/root               122.3M     26.7M     93.0M  22% /
tmpfs                     1.9G    216.0K      1.9G   0% /tmp
/dev/sda1                16.0M      6.3M      9.7M  39% /boot
/dev/sda1                16.0M      6.3M      9.7M  39% /boot
tmpfs                   512.0K         0    512.0K   0% /dev
查看空间没有变化,绝望
参考该文章在 cfdisk 中进行 sort 排序,奇迹发生了
过程记录:
root@OpenWrt:~# cfdisk

root@OpenWrt:~# tune2fs -O resize_inode /dev/sda2
tune2fs 1.47.0 (5-Feb-2023)
Setting filesystem feature 'resize_inode' not supported.
root@OpenWrt:~# tune2fs -O^resize_inode /dev/sda2
tune2fs 1.47.0 (5-Feb-2023)

Please run e2fsck -f on the filesystem.

root@OpenWrt:~# mount -o remount,ro /
root@OpenWrt:~# e2fsck -f /dev/sda2
e2fsck 1.47.0 (5-Feb-2023)
Filesystem does not have resize_inode enabled, but s_reserved_gdt_blocks
is 7; should be zero.  Fix<y>? yes
Resize_inode not enabled, but the resize inode is non-zero.  Clear<y>? yes
Pass 1: Checking inodes, blocks, and sizes
Pass 2: Checking directory structure
Pass 3: Checking directory connectivity
Pass 4: Checking reference counts
Pass 5: Checking group summary information
Block bitmap differences:  -(2--8) -1451
Fix<y>? yes
Free blocks count wrong for group #0 (24471, counted=24479).
Fix<y>? yes
Free blocks count wrong (24471, counted=24479).
Fix<y>? yes

rootfs: ***** FILE SYSTEM WAS MODIFIED *****
rootfs: ***** REBOOT SYSTEM *****
rootfs: 1648/6656 files (0.0% non-contiguous), 8289/32768 blocks
root@OpenWrt:~# tune2fs -O^resize_inode /dev/sda2
tune2fs 1.47.0 (5-Feb-2023)
root@OpenWrt:~# e2fsck -f /dev/sda2
e2fsck 1.47.0 (5-Feb-2023)
Pass 1: Checking inodes, blocks, and sizes
Pass 2: Checking directory structure
Pass 3: Checking directory connectivity
Pass 4: Checking reference counts
Pass 5: Checking group summary information
rootfs: 1648/6656 files (0.0% non-contiguous), 8289/32768 blocks
root@OpenWrt:~# reboot
root@OpenWrt:~# Connection to 192.168.10.3 closed by remote host.
Connection to 192.168.10.3 closed.

C:\Users\qcnhy>ssh root@192.168.10.3


BusyBox v1.36.1 (2025-06-23 20:40:36 UTC) built-in shell (ash)

_______                     ________        __
|       |.-----.-----.-----.|  |  |  |.----.|  |_
|   -   ||  _  |  -__|     ||  |  |  ||   _||   _|
|_______||   __|_____|__|__||________||__|  |____|
        |__| W I R E L E S S   F R E E D O M
-----------------------------------------------------
OpenWrt 24.10.2, r28739-d9340319c6
-----------------------------------------------------
=== WARNING! =====================================
There is no root password defined on this device!
Use the "passwd" command to set up a new password
in order to prevent unauthorized SSH logins.
--------------------------------------------------
root@OpenWrt:~# resize2fs /dev/sda2
resize2fs 1.47.0 (5-Feb-2023)
Filesystem at /dev/sda2 is mounted on /; on-line resizing required
old_desc_blocks = 1, new_desc_blocks = 1
The filesystem on /dev/sda2 is now 1044411 (4k) blocks long.

root@OpenWrt:~# df -h
Filesystem                Size      Used Available Use% Mounted on
/dev/root                 3.9G     26.7M      3.9G   1% /
tmpfs                     1.9G    224.0K      1.9G   0% /tmp
/dev/sda1                16.0M      6.3M      9.7M  39% /boot
/dev/sda1                16.0M      6.3M      9.7M  39% /boot
tmpfs                   512.0K         0    512.0K   0% /dev
root@OpenWrt:~#
为了确认是哪一步出现问题,我决定恢复快照重试一次。回到快照点 1
再次扩容硬盘
设置好代理之后
opkg update
opkg install cfdisk
cfdisk
 还是不进行排序,resize 之后 write
opkg install resize2fs
resize2fs /dev/sda2
报错,继续
opkg install tune2fs
root@OpenWrt:~# e2fsck -f /dev/sda2
e2fsck 1.47.0 (5-Feb-2023)
Pass 1: Checking inodes, blocks, and sizes
Pass 2: Checking directory structure
Pass 3: Checking directory connectivity
Pass 4: Checking reference counts
Pass 5: Checking group summary information
Padding at end of inode bitmap is not set. Fix<y>? no

rootfs: ********** WARNING: Filesystem still has errors **********

rootfs: 1648/6656 files (0.0% non-contiguous), 8297/32768 blocks
还是到了这一不正确的步骤,不应该只有一个 y,所以我选择了 no,回到快照点 1 继续
三次扩容硬盘
设置好代理之后
opkg update
opkg install cfdisk
cfdisk
调整好 resize-write-quit
opkg install tune2fs resize2fs # 提前安装resize2fs
tune2fs -O^resize_inode /dev/sda2 #删除GPT块
mount -o remount,ro /
e2fsck -f /dev/sda2


e2fsck 1.47.0 (5-Feb-2023)
Filesystem does not have resize_inode enabled, but s_reserved_gdt_blocks
is 7; should be zero.  Fix<y>? yes
Resize_inode not enabled, but the resize inode is non-zero.  Clear<y>? yes
Pass 1: Checking inodes, blocks, and sizes
Pass 2: Checking directory structure
Pass 3: Checking directory connectivity
Pass 4: Checking reference counts
Pass 5: Checking group summary information
Block bitmap differences:  -(2--8) -1451
Fix<y>? yes
Free blocks count wrong for group #0 (18345, counted=18353).
Fix<y>? yes
Free blocks count wrong (18345, counted=18353).
Fix<y>? yes
Padding at end of inode bitmap is not set. Fix<y>? yes

rootfs: ***** FILE SYSTEM WAS MODIFIED *****
rootfs: ***** REBOOT SYSTEM *****
rootfs: 1643/6656 files (0.0% non-contiguous), 8271/26624 blocks
看来关键是删除 GPT 块,出现了多处 fix
随后重启 reboot
root@OpenWrt:~# resize2fs /dev/sda2
resize2fs 1.47.0 (5-Feb-2023)
Filesystem at /dev/sda2 is mounted on /; on-line resizing required
old_desc_blocks = 1, new_desc_blocks = 1
The filesystem on /dev/sda2 is now 1044411 (4k) blocks long.

root@OpenWrt:~# df -h
Filesystem                Size      Used Available Use% Mounted on
/dev/root                 3.9G     26.7M      3.9G   1% /
tmpfs                     1.9G      1.2M      1.9G   0% /tmp
/dev/sda1                16.0M      6.3M      9.7M  39% /boot
/dev/sda1                16.0M      6.3M      9.7M  39% /boot
tmpfs                   512.0K         0    512.0K   0% /dev
果然,关键在于删除 GPT 块,至此扩容成功。忘记打快照了。
安装模块驱动
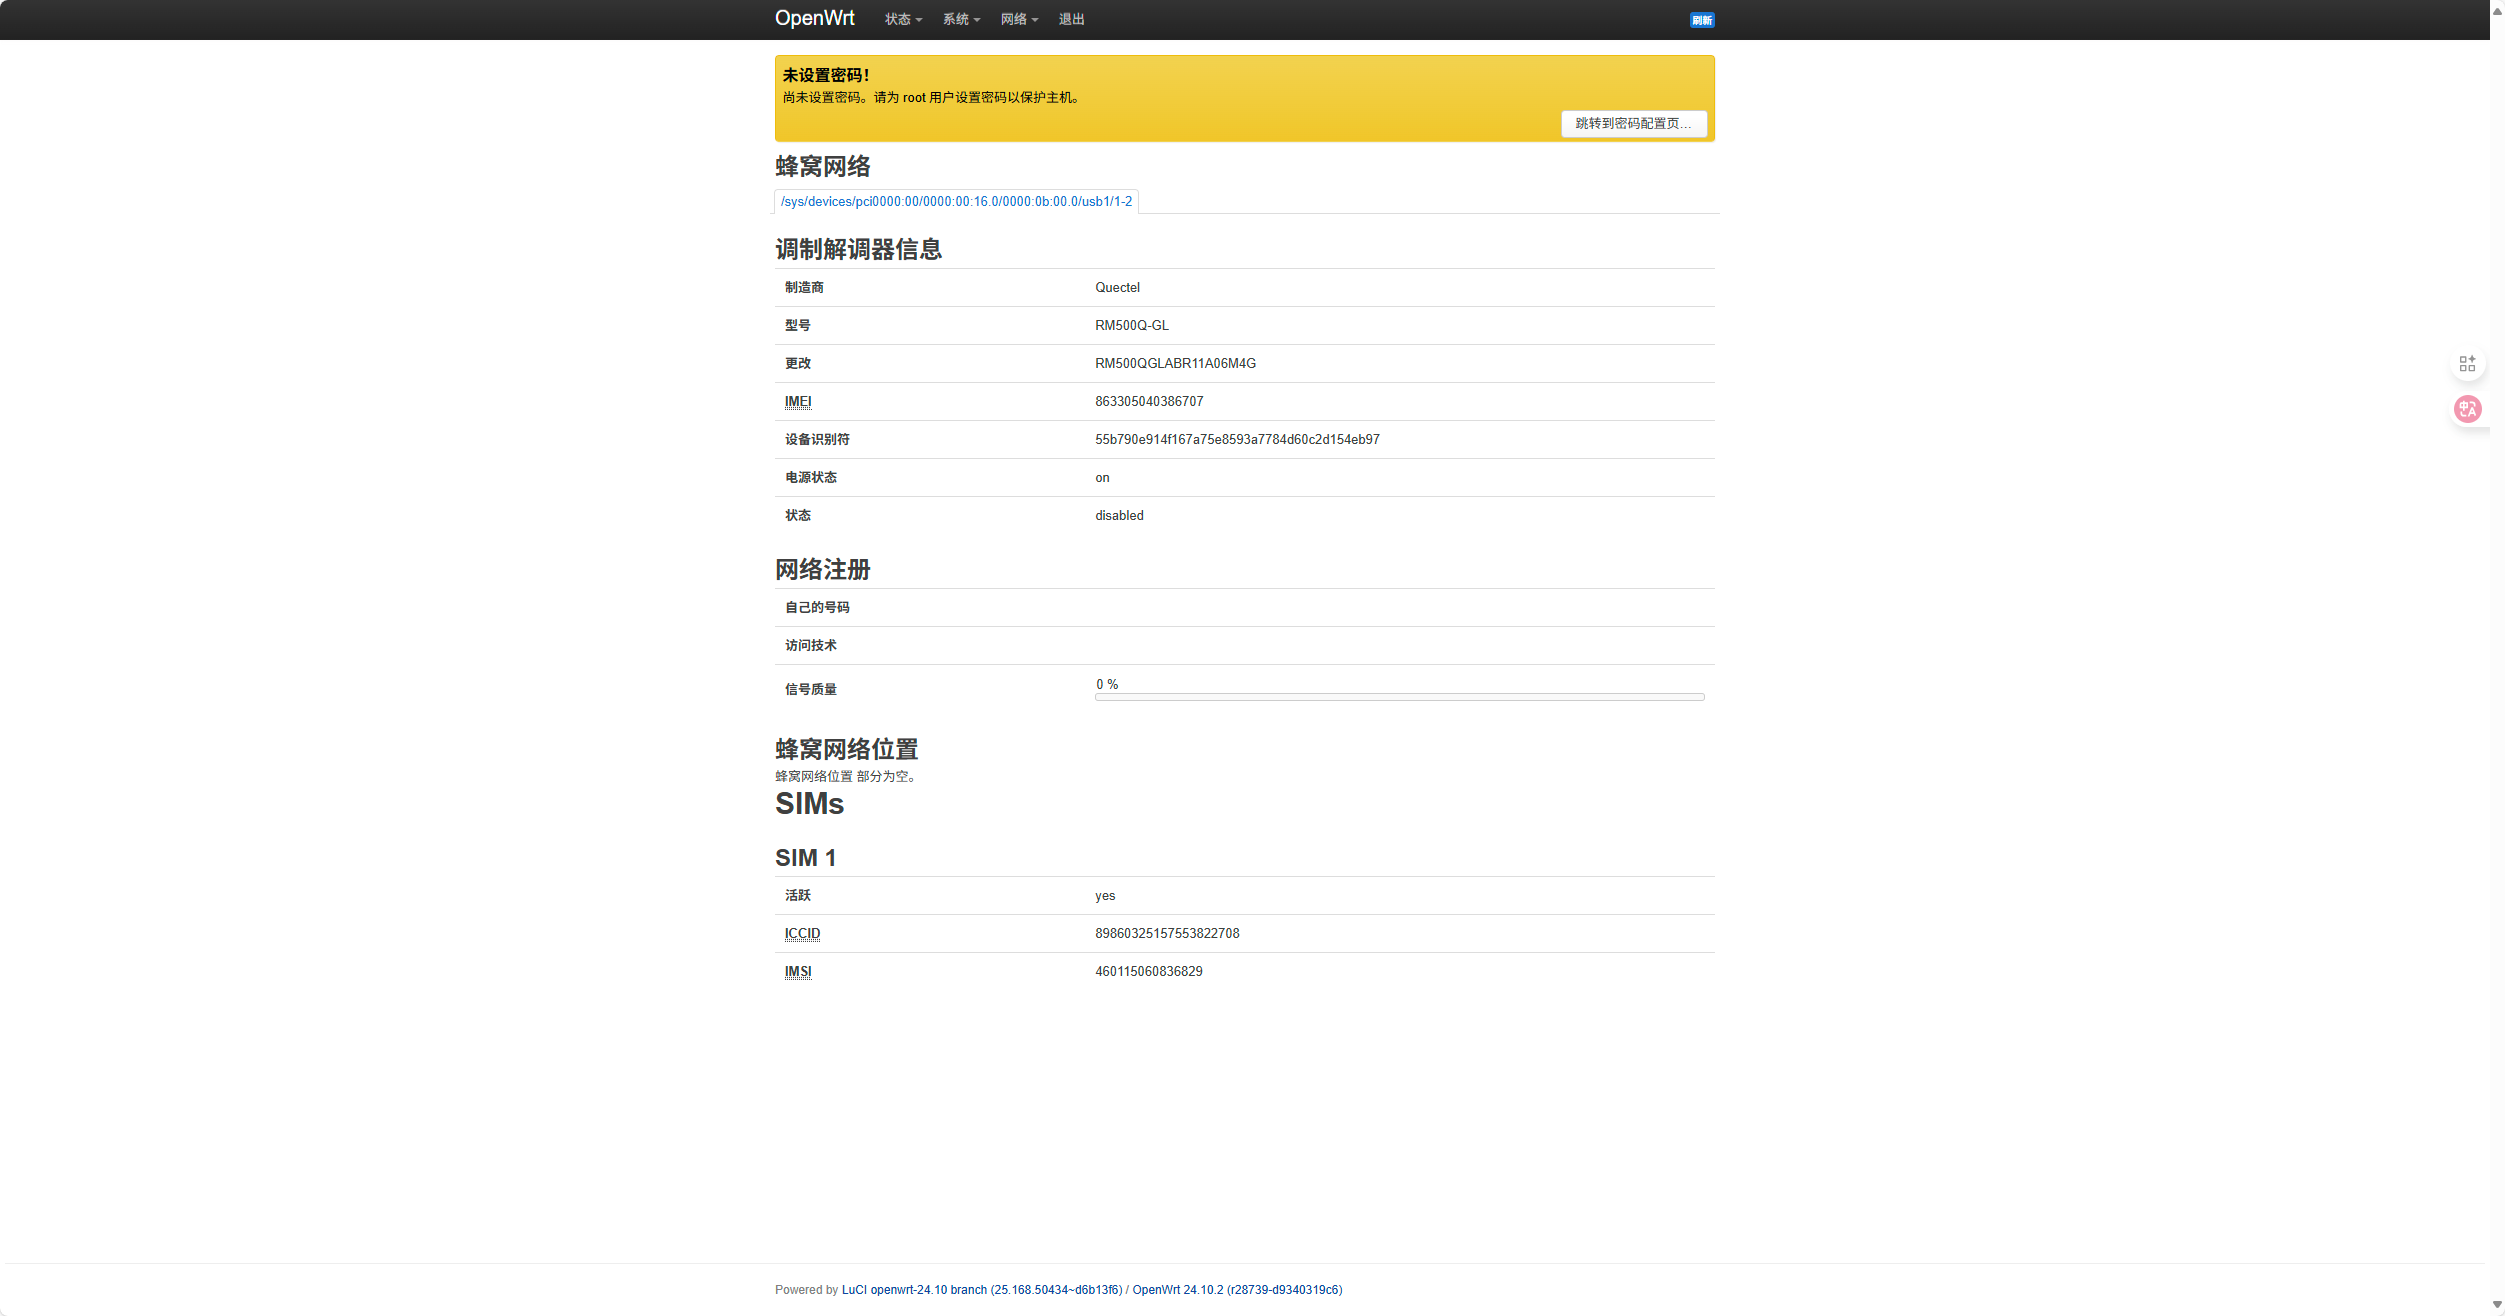
参考在 openwrt 上使用 RM500Q-GL 模块把软件都安装了
设置 USB 直通
安装完 QMI 驱动,设置 USB 直通
参考知乎文章
-
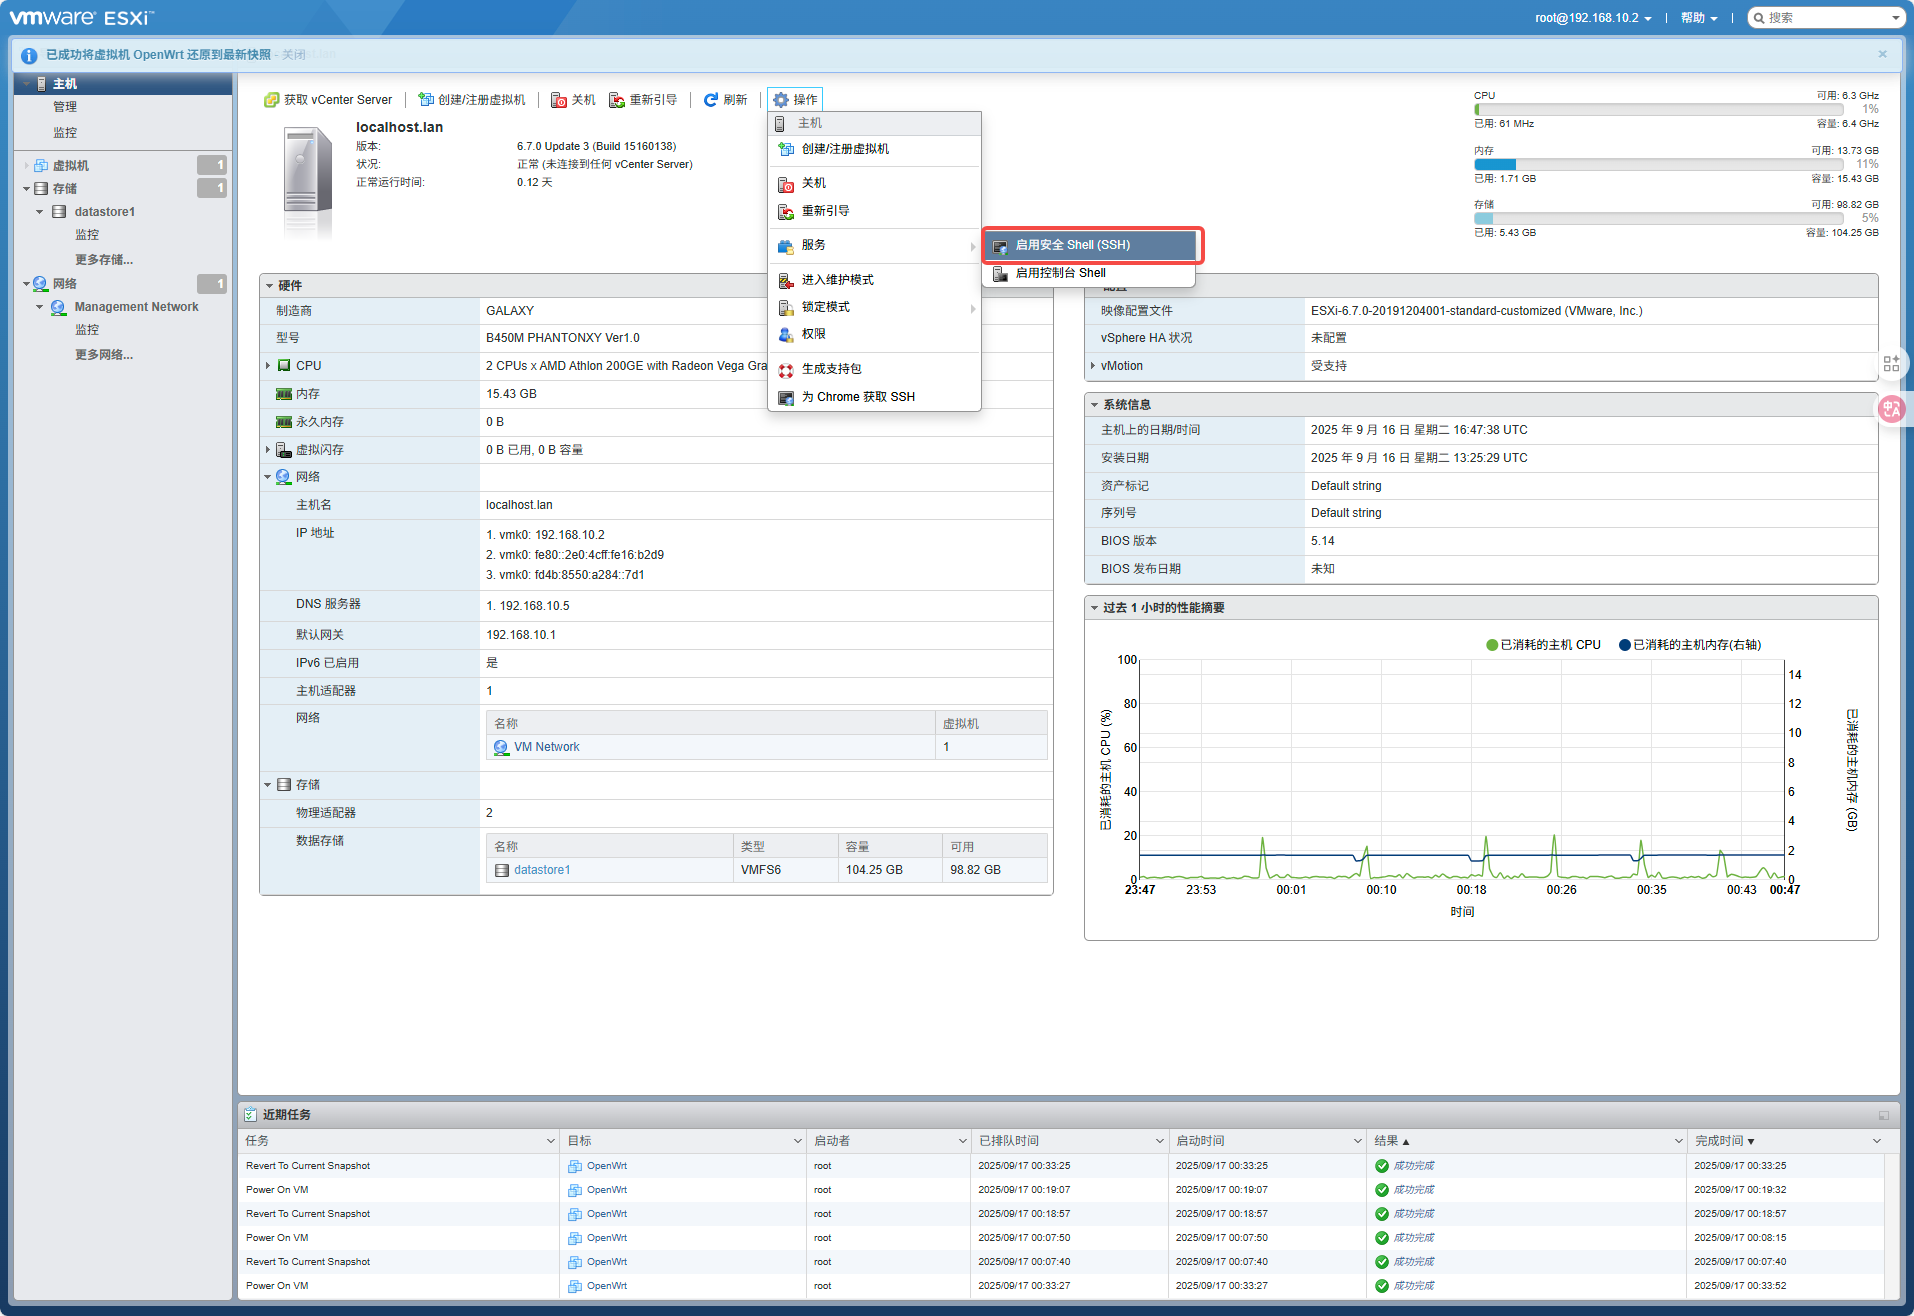
启用 exsi 的 SSH 功能
-
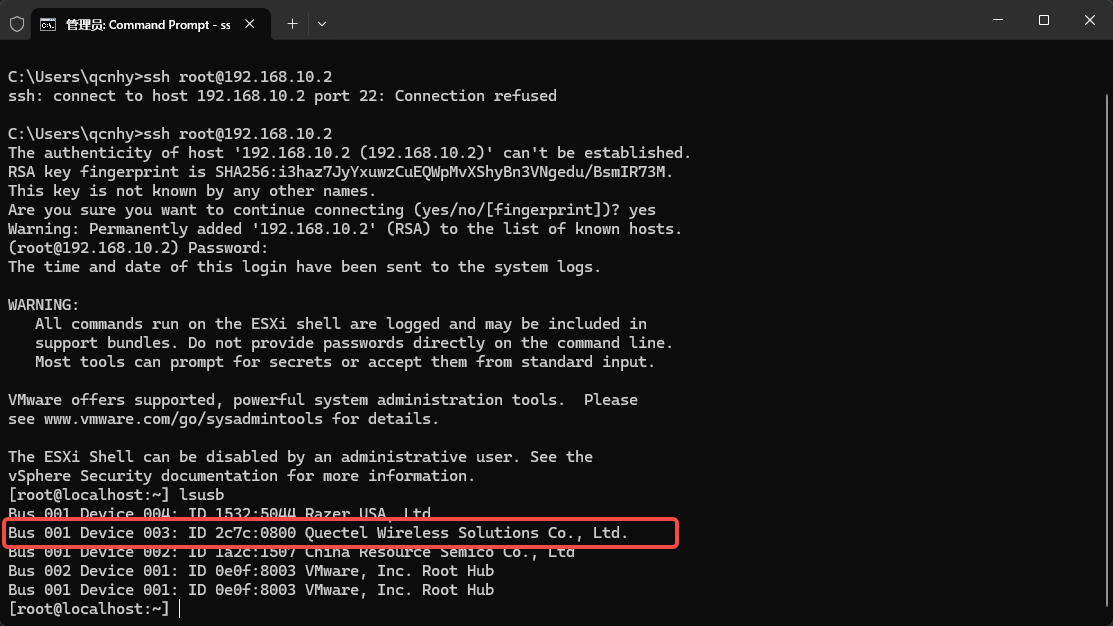
查看 USB 设备的 VID 和 PID 号
-
进入虚拟机设置添加参数
usb.genreic.allowHID TRUE
usb.quirks.device0   0x2c7c:0x0800 allow

usb.quirks.device1   0x2c7c:0x0800 allow # 多个设备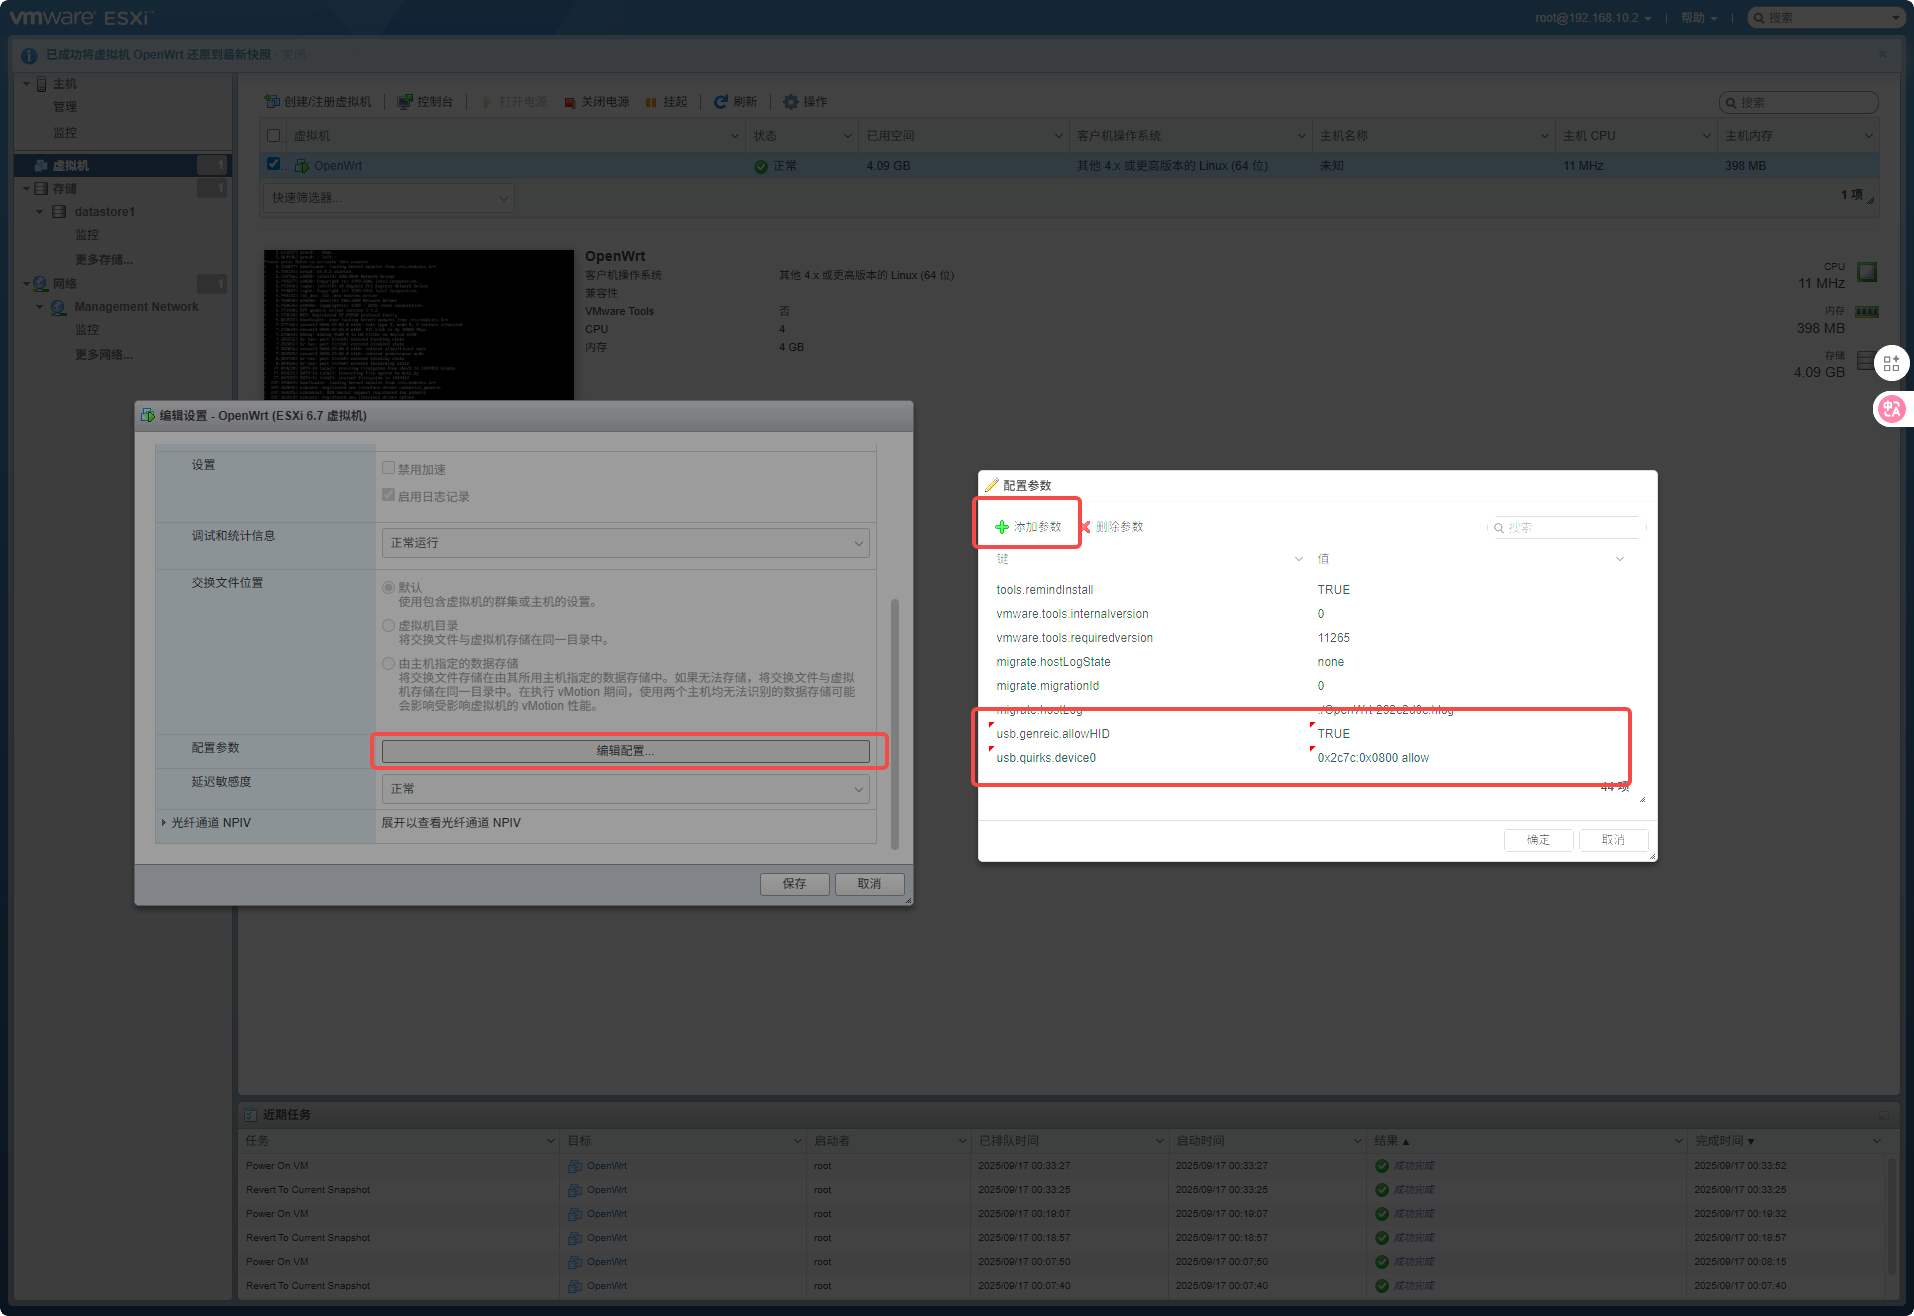
-
修改 exsi 的/etc/vmware/config 配置
末尾新增行
usb.quirks.device0 = "0x2c7c:0x0800 allow" usb.quirks.device1 = "0x2c7c:0x0800 allow" #多个设备 -
修改启动引导文件/bootbank/boot.cfg
ESXi 重启后还会再次获取设备的控制权,因此需要在 ESXi 启动引导中禁用 VMkernel 对上述设备的控制权。
在“kernelopt=”行末尾添加 : 一个设备
CONFIG./USB/quirks=0x2c7c:0x0800::0xffff:UQ_KBD_IGNORE两个设备
CONFIG./USB/quirks=0x046d:0xc534::0xffff:UQ_KBD_IGNORE:0x046d:0xc52f::0xffff:UQ_KBD_IGNORE以此类推,添加第三个 USB 设备则在末尾追加:
:0x\***\*:0x\*\***::0xffff:UQ_KBD_IGNORE注意 CONFIG 前有空格
-
重启 exsi 顺便打个快照,快照点 2
-
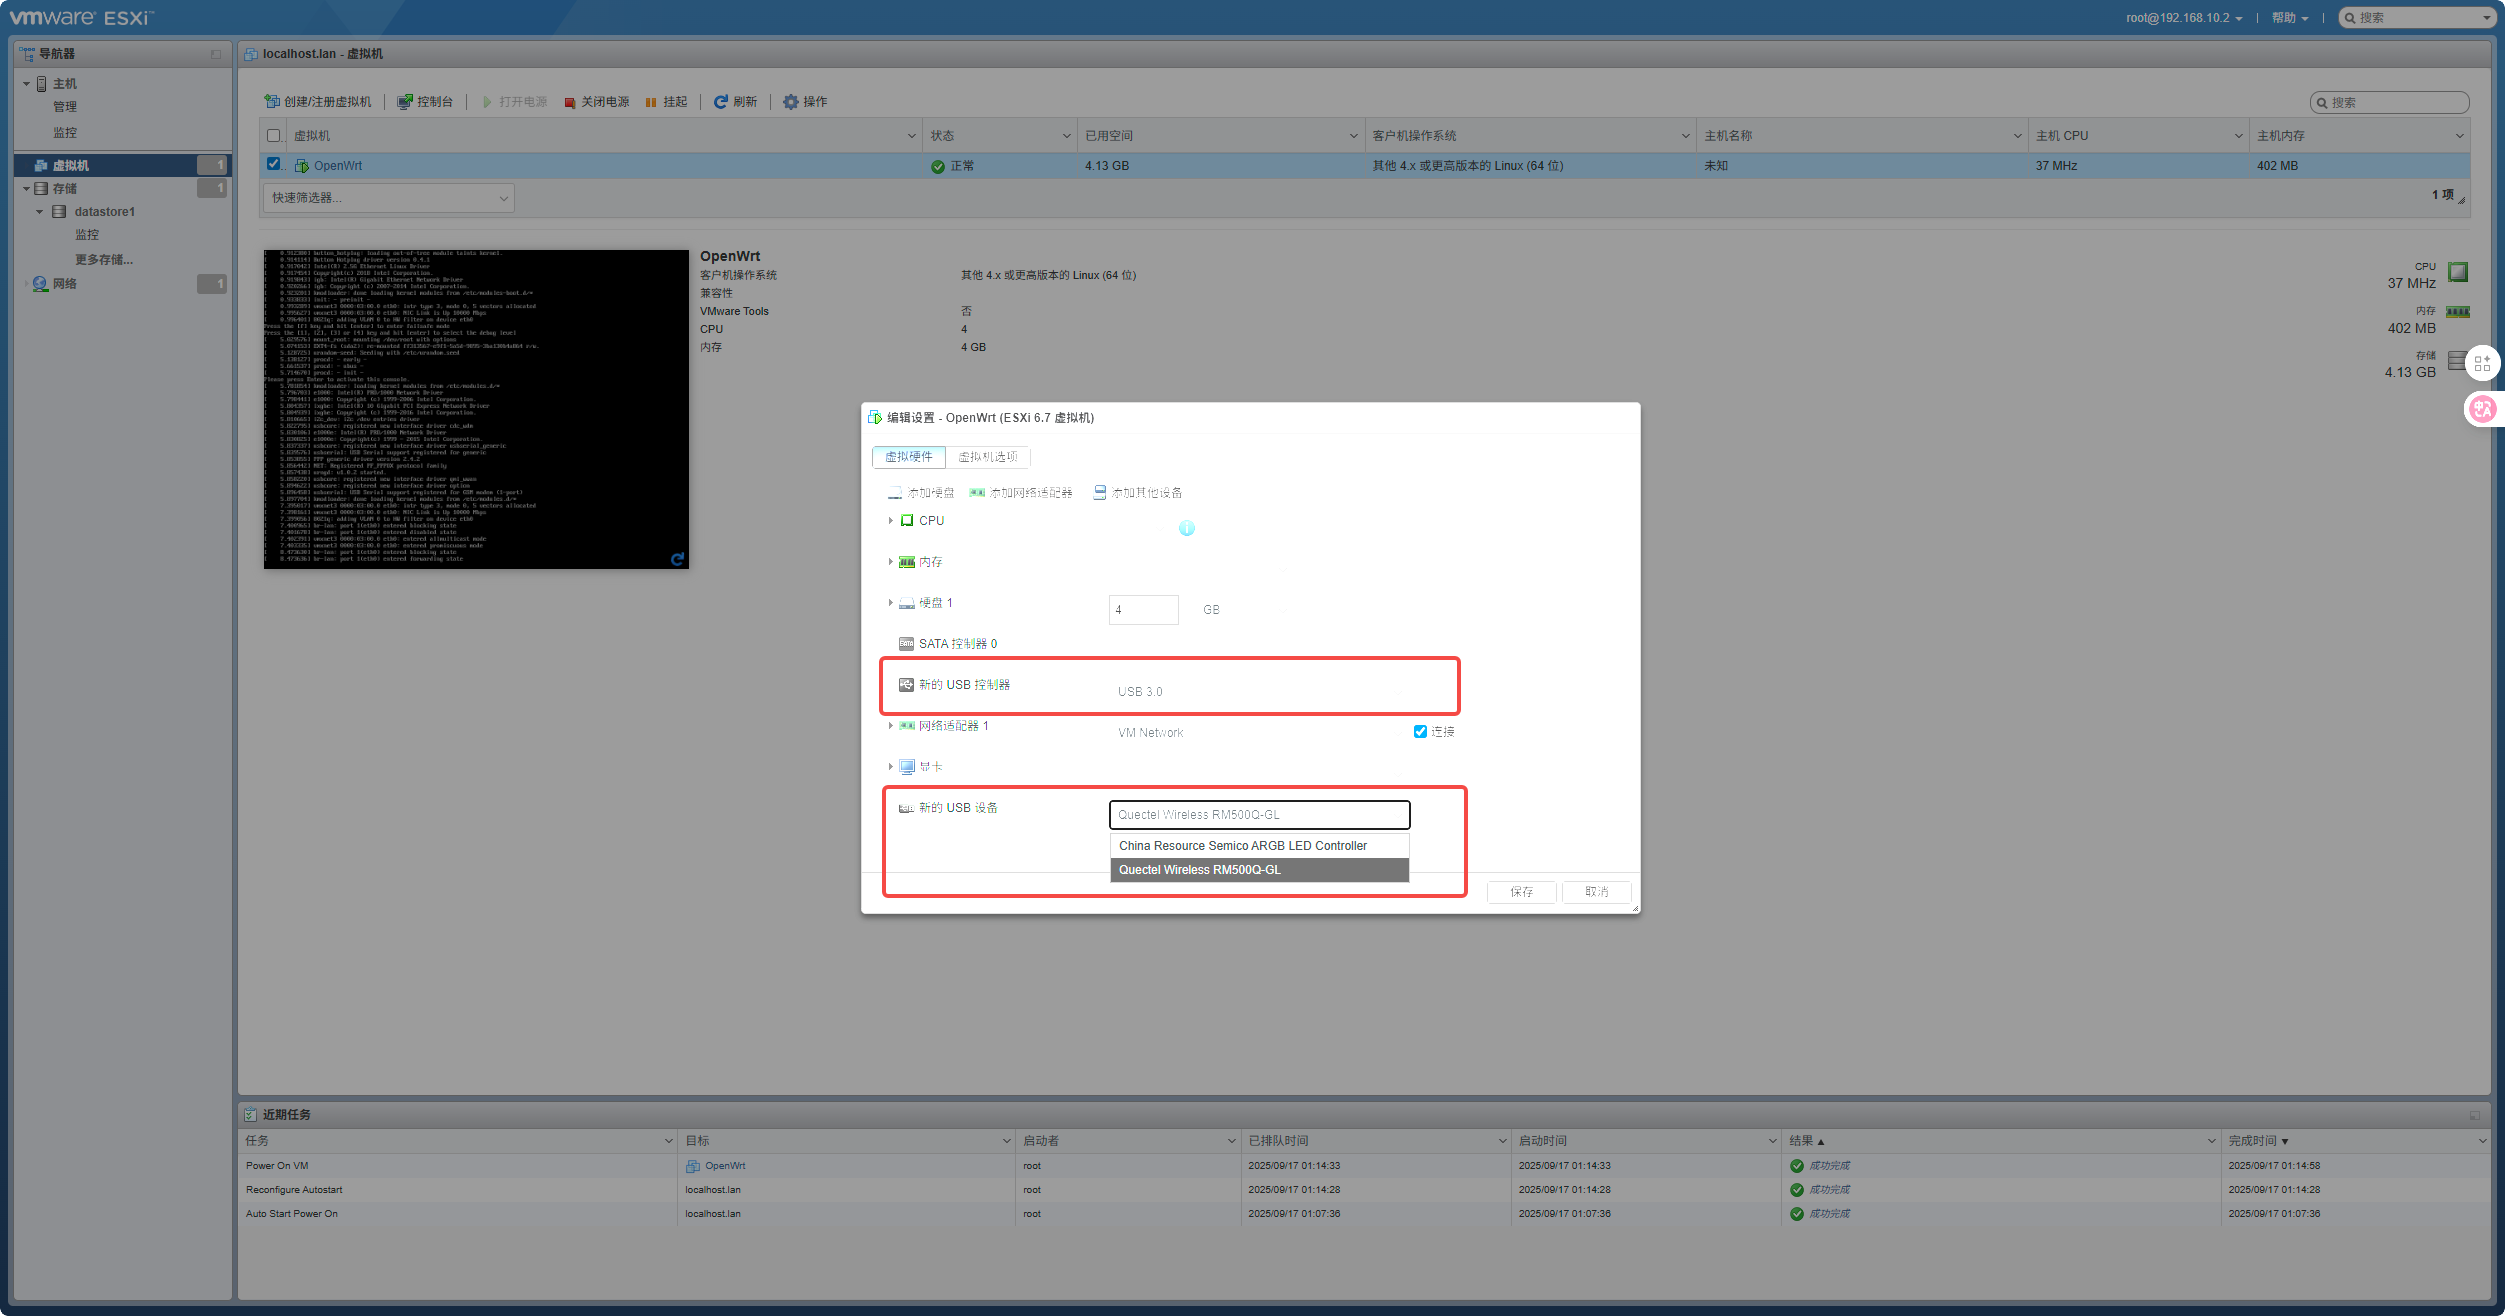
添加 USB 设备 在虚拟机设置中添加需要直通的 USB 设备,不可以热拔插,所以已经启动的虚拟机需要关机
-
启动虚拟机
 牛逼
牛逼
继续剩下的配置
继续设置代理,继续参考在 openwrt 上使用 RM500Q-GL 模块的后半部分,还有几个软件包需要安装,在此之前我们先连接 5G 模块。
-
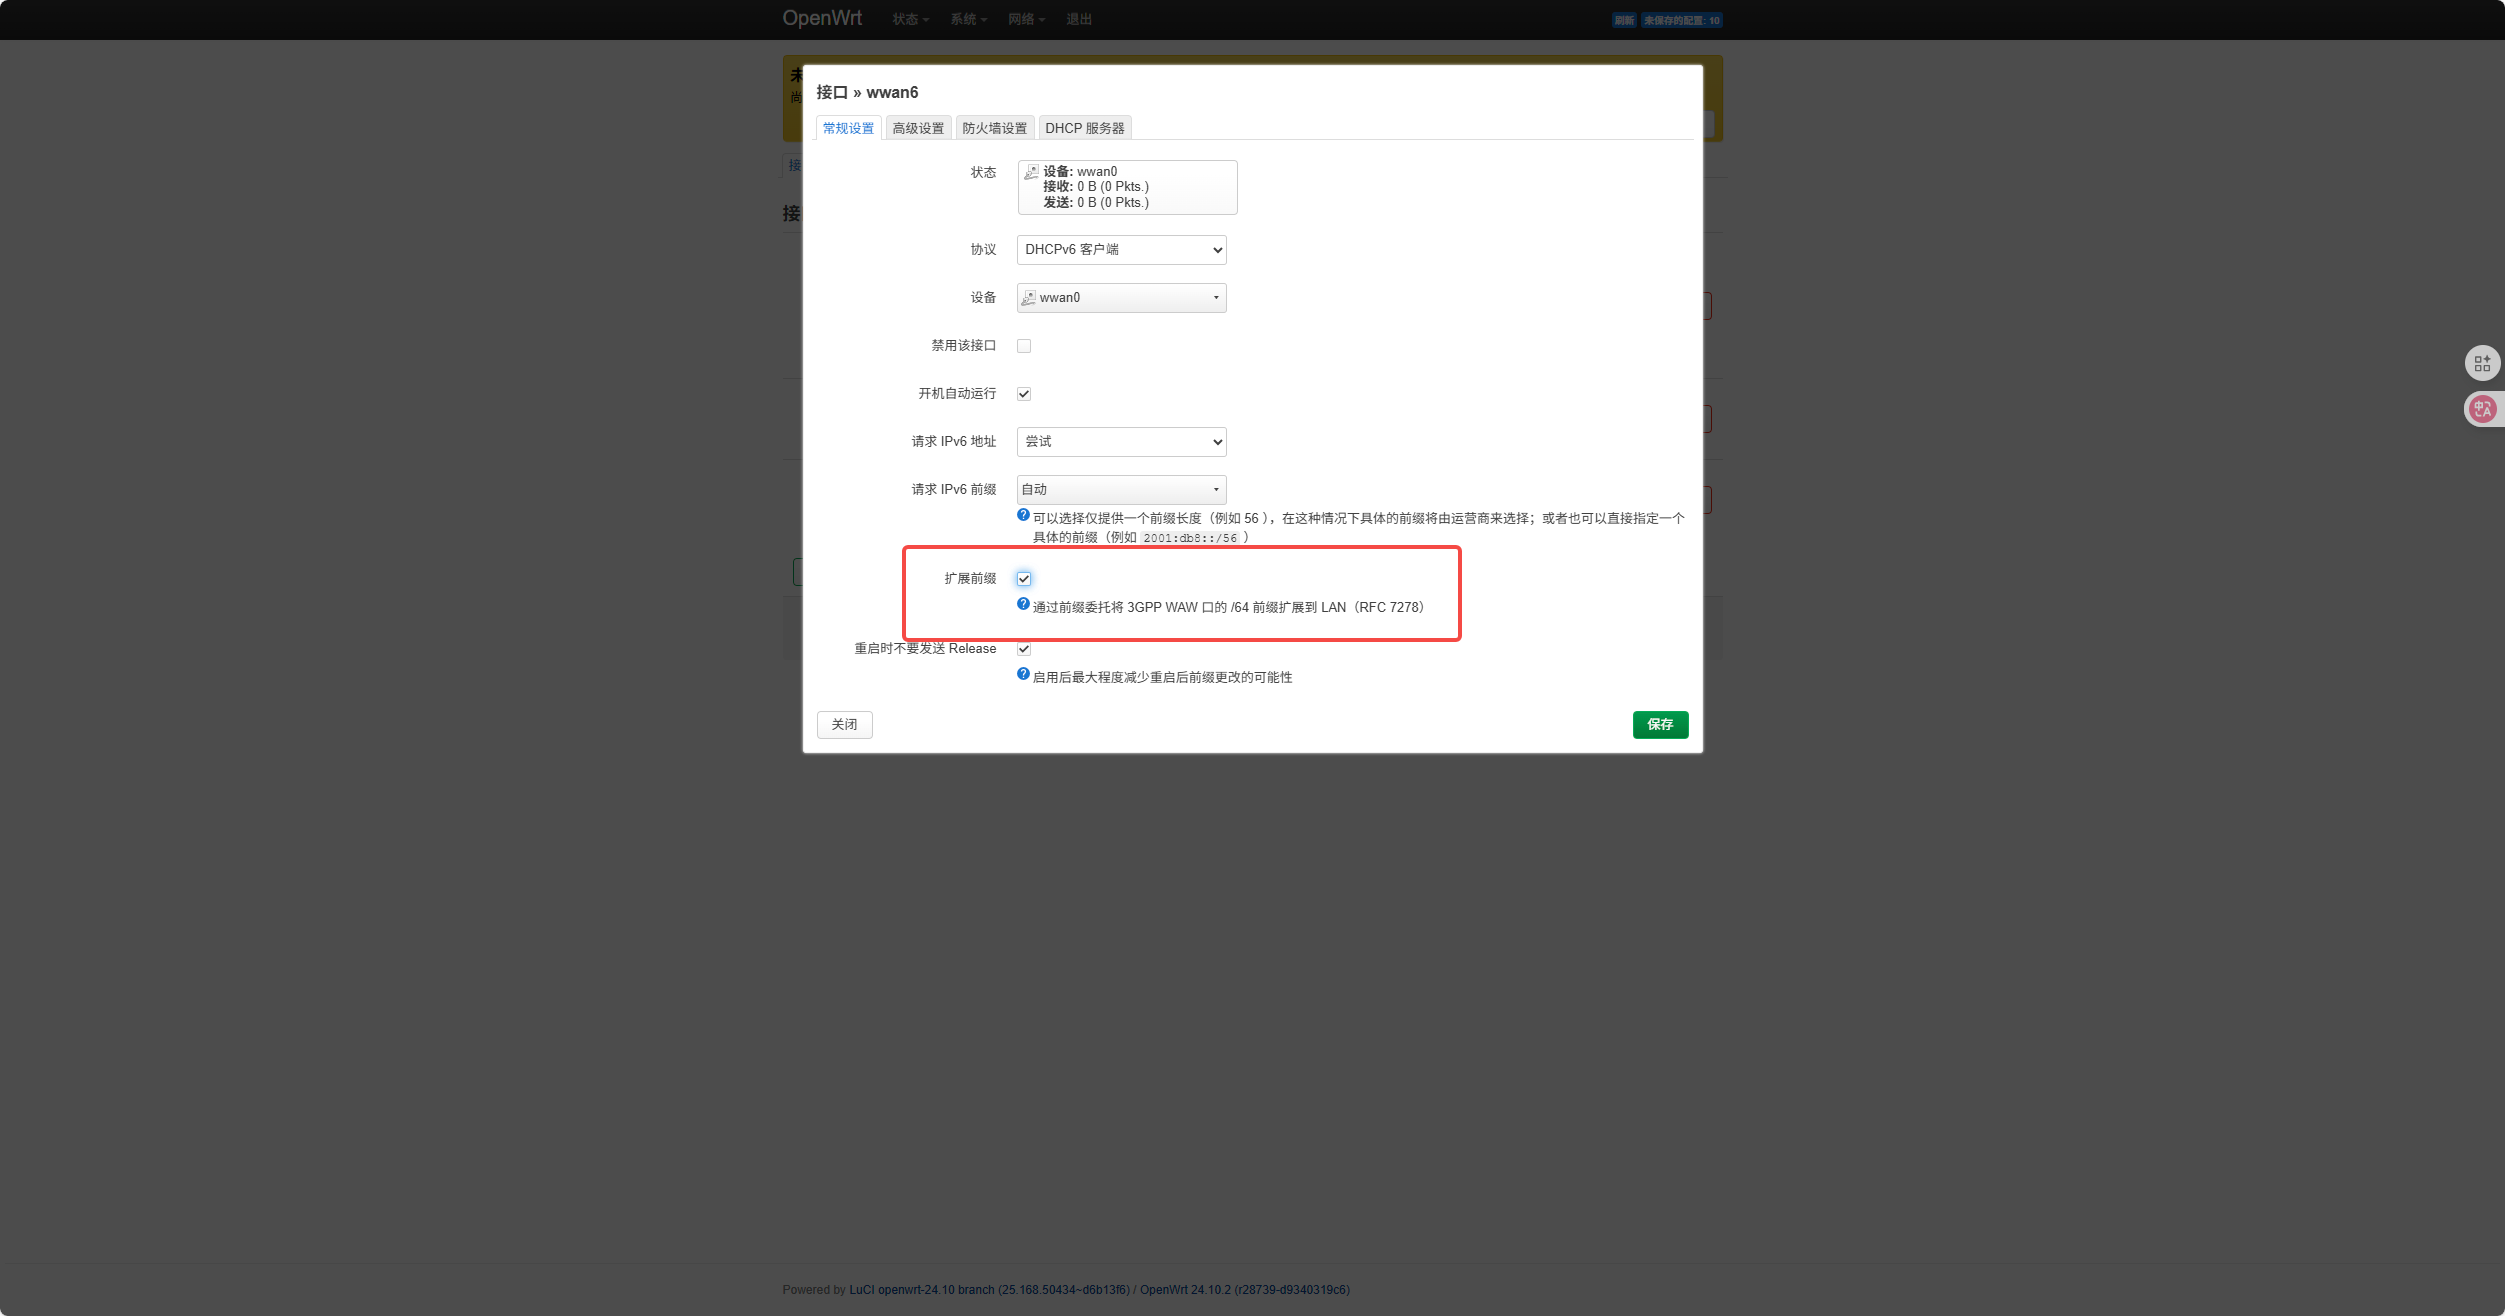
创建 wwan0、wwan6 接口
-
模块连接网络
mmcli -m "$(mmcli -L | grep -o '/Modem/[0-9]\+' | grep -o '[0-9]\+' | head -n 1)" --simple-connect="ip-type=ipv4v6" ip link set wwan0 down && ip link set wwan0 up -
设置 lan 口
 删除这个本地 ipv6
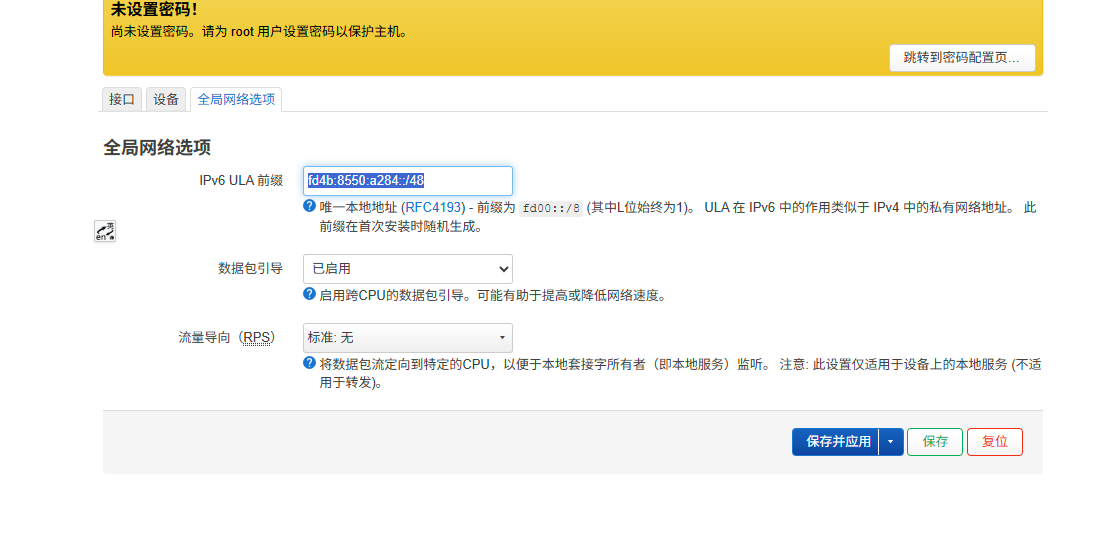 取消网关
取消网关
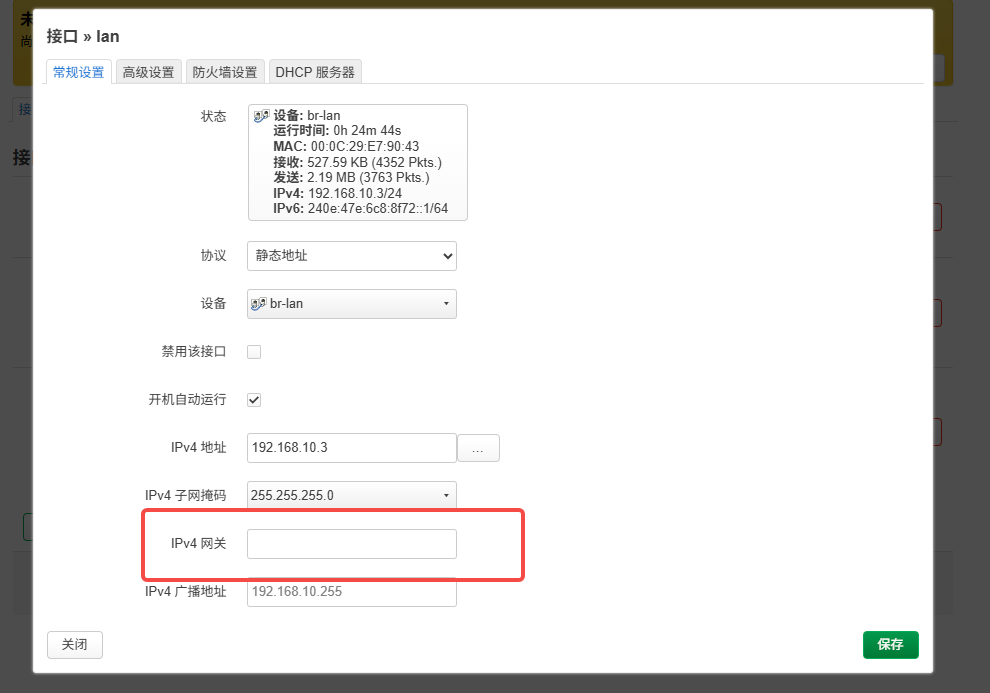 其实用代理的方式全程不需要网关,似乎也没什么用
 -
移除主路由 其实全程也是不需要主路由的,全部都用手动静态 IP 的方式,利用代理从电脑连接热点出口上网即可。所以现在先恢复原有的网络拓补,切换到有线中继上,避免 DHCP 乱套。
取消电脑的手动配置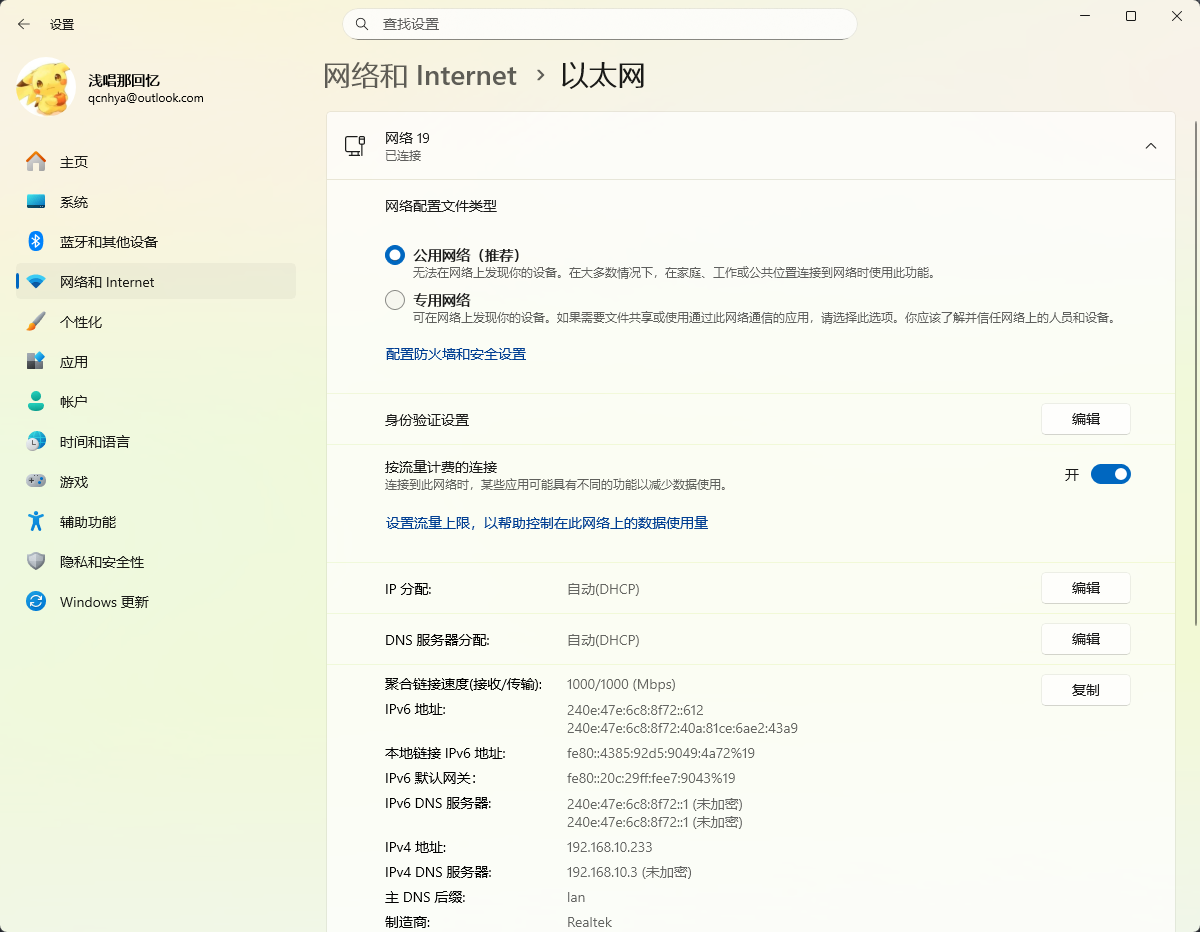 可以正常获取到 IP 地址并且联网的,IPV6 也是正常的
 -
继续下载剩余软件包 还是设置好代理,下载比较稳定,注意 IP 变化
opkg install luci-app-wol luci-i18n-wol-zh-cn opkg install openssh-sftp-server # 安装SFTP opkg install dbus-utils # 监控脚本使用 -
安装配置 Zerotier
opkg install zerotier-
启用 zerotier
vi /etc/config/zerotier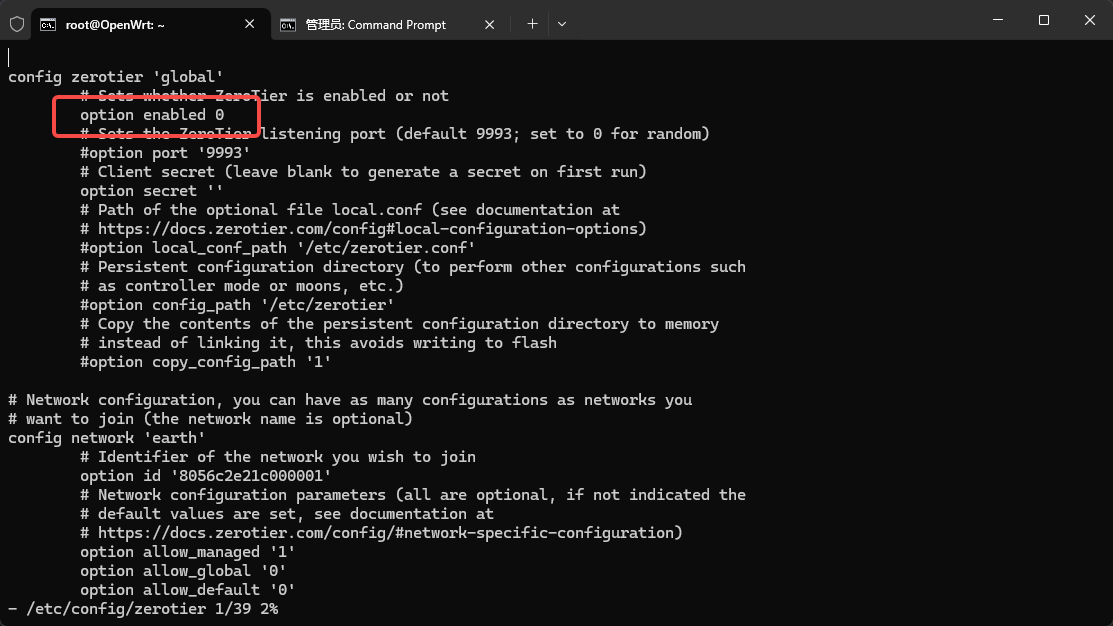 修改为 1,并且启动 zerotier
service zerotier start -
复制配置文件 这步为了使用自定义的 Planet,在配置文件中设置使用我们自己的 config 目录
cp -r /tmp/lib/zerotier-one /etc/zerotier-one -
修改 config 目录
vi /etc/config/zerotier config zerotier 'global' option enabled '1' option secret '' option config_path '/etc/zerotier-one' # 增加这行 为刚才复制的配置目录 option copy_config_path '1' # 增加这行 避免配置被覆盖,每次都把/etc/zerotier-one的配置目录覆盖到实际的运行目录,之前对实际运行目录的修改将全部失效还原成上面目录的,否则则使用链接的方式,对实际运行目录的修改将直接实际影响到上一行中目录文件 config network 'earth' option id '5873cad879664679' #修改 option allow_managed '1' option allow_global '0' option allow_default '0' option allow_dns '0' -
通过 scp 替换 planet 文件
scp planet root@192.168.10.3:/etc/zerotier-one -
重启 zerotier
service zerotier restart -
准入网络

-
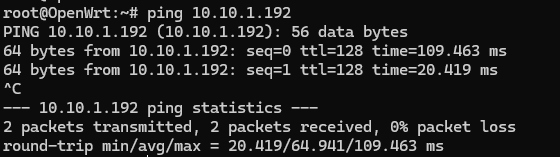
测试网络 ping 任意一个虚拟网内 IP
-
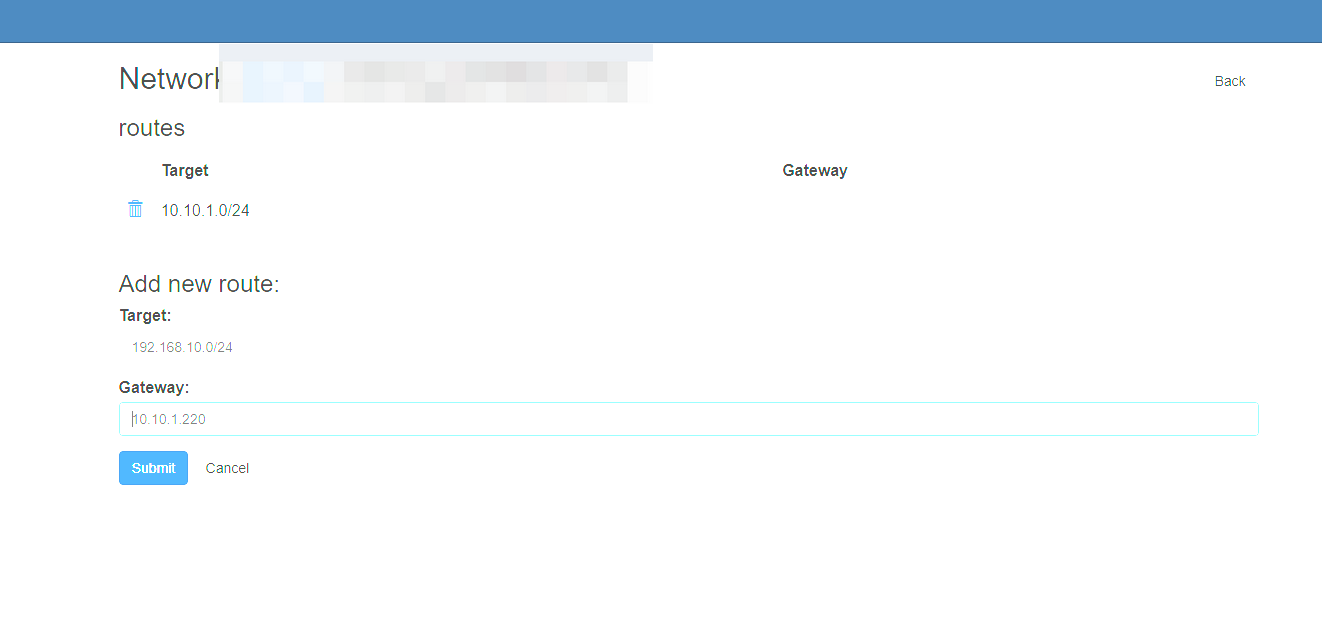
调整路由
-
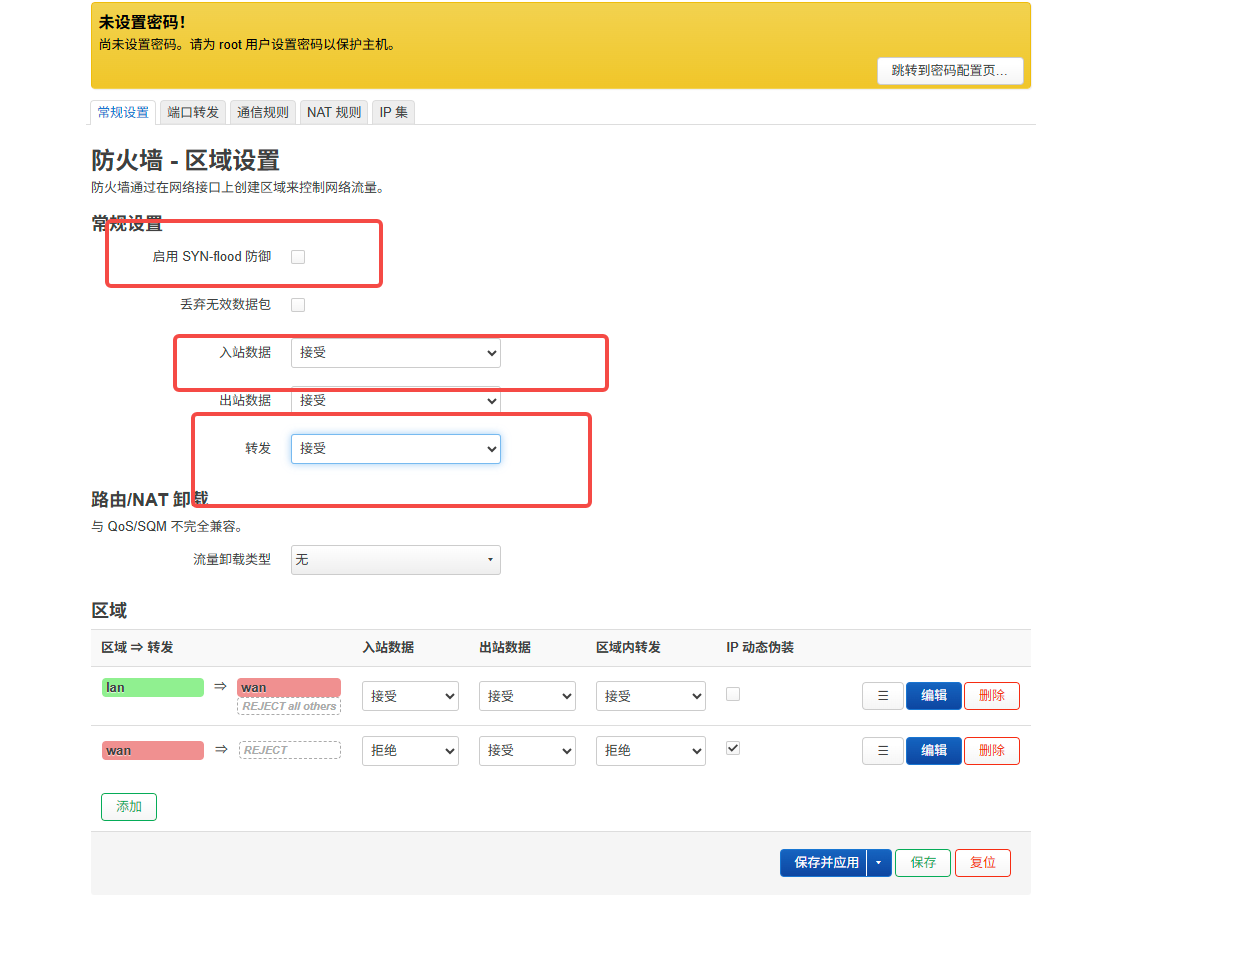
调整防火墙
-
-
传入监控脚本
scp modem_event_listener.sh root@192.168.10.3:/root -
赋予执行权限
chmod +x ./modem_event_listener.sh -
设置启动脚本
# Put your custom commands here that should be executed once # the system init finished. By default this file does nothing. sleep 15 mmcli -m "$(mmcli -L | grep -o '/Modem/[0-9]\+' | grep -o '[0-9]\+' | head -n 1)" --simple-connect="ip-type=ipv4v6" 2>&1 | logger -t modem-setup mmcli -m "$(mmcli -L | grep -o '/Modem/[0-9]\+' | grep -o '[0-9]\+' | head -n 1)" --command='AT+CMGD=1,4' ip link set wwan0 down && ip link set wwan0 up /root/modem_event_listener.sh & exit 0 -
设置 modemmanager 为日志等级为 DEBUG 因为 AT 命令是清空短信收件箱,防止短信满,而执行 AT 命令需要 DEBUG 级别才可以执行
vi /etc/init.d/modemmanager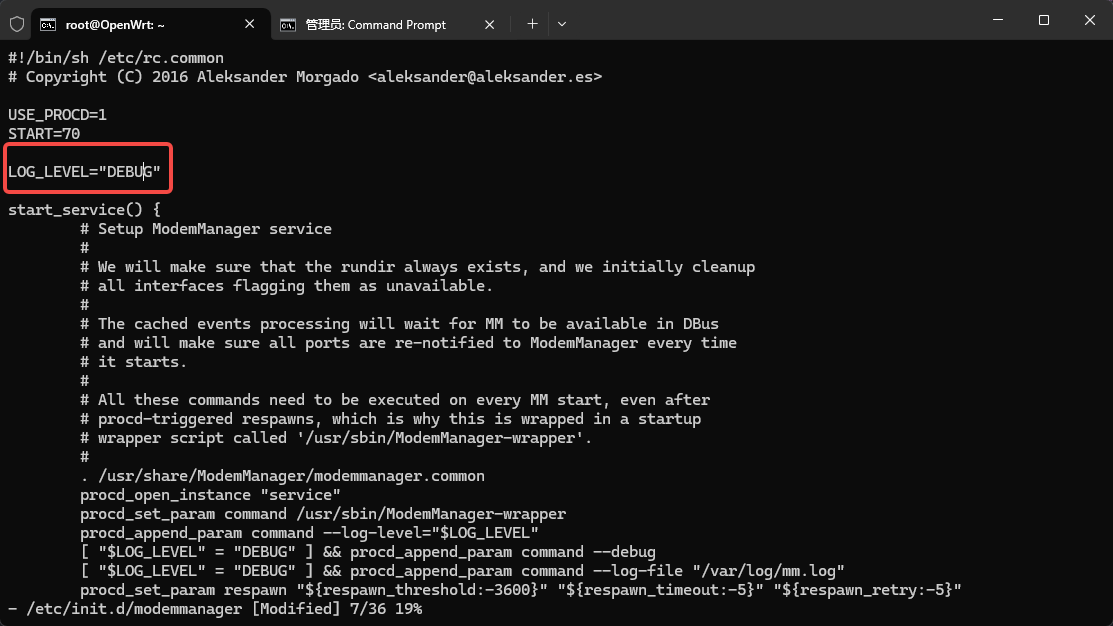
-
不做定时发短信查流量了,在手机上使用营业厅进行查询
-
打快照后面的内容少儿不宜了,撒花完结

